How To Fix Error Establishing a Database Connection

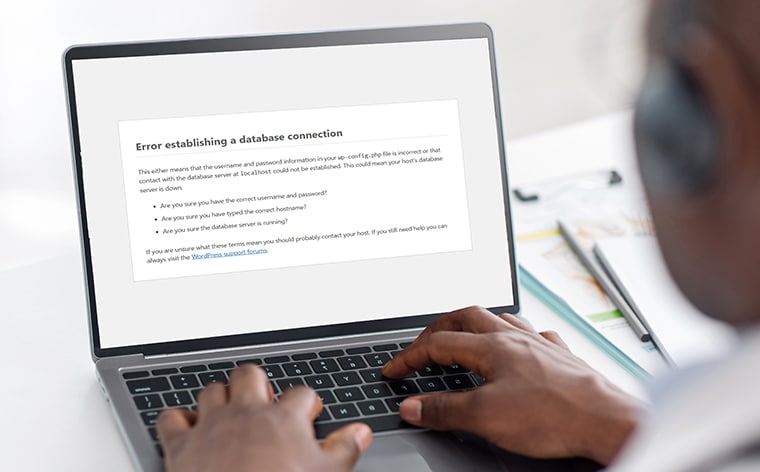
If you’ve ever come across the message “Error Establishing a Database Connection” while visiting your website, you know how worrying it can feel. This error happens when your website cannot connect to its database, which is where all your site’s important information, like posts, pages, and settings, is stored.

This problem is pretty common, especially for websites built with tools like WordPress or other systems that rely heavily on databases. It’s often caused by simple issues like incorrect settings, server problems, or database errors.

For website owners, this error can be frustrating because it makes the entire site inaccessible. Visitors see a blank screen instead of the content they expect, which can hurt your site’s reputation.

The good news? Fixing this error is usually straightforward if you understand what’s causing it. In this post, we’ll explore why this error happens and give you clear, easy-to-follow steps to solve it. By the end, you’ll feel more confident in handling this issue if it ever comes up.

What is the “Error Establishing a Database Connection”?

This error happens when your website can’t connect to its database. The database is like your site’s memory. It stores everything, including your content, user data, and settings. If the connection between your site and the database breaks, your website won’t load properly.

This problem is especially common in platforms like WordPress. That’s because WordPress uses a database to manage all its information, from blog posts to themes and plugins. When the connection fails, your site can’t pull the data it needs to display anything.

The database plays a key role in how your website works. Without it, your site wouldn’t know what to show visitors. This is why fixing this error is so important—it gets your site back up and running smoothly.

Why Does This Error Occur?

The “Error Establishing a Database Connection” can happen for several reasons. Here are the most common causes:

  1. Incorrect Database Credentials: Your website needs the right database name, username, password, and host to connect. If any of these details are wrong, the connection will fail.
  2. Database Server Issues: Sometimes, the server hosting your database is down or overloaded. If the server can’t respond, your site won’t connect to the database.
  3. Corrupted Database: A database can become corrupted due to unexpected crashes or issues during updates. When this happens, the connection might stop working.
  4. Exceeded Hosting Resources: If your hosting plan has limits on storage or traffic and those limits are exceeded, it can disrupt the database connection.
  5. File Corruption: Core files in your website may get corrupted due to failed updates, malware, or accidental changes. This can block the database connection.
  6. Plugin or Theme Conflicts: Sometimes, a poorly coded or incompatible plugin or theme can interfere with your website’s database connection.
  7. Changed Database Location: If your database has been moved to a new server or the hosting environment has changed, your website may need updated connection details.
  8. Permissions Issues: The database user might not have the right permissions to access the data, causing the connection to fail.

By identifying the specific cause, you can take the right steps to fix the error and get your website running again.

How to Identify the Root Cause

When you see the “Error Establishing a Database Connection,” the first step is to figure out what’s causing it. Here’s how you can do that:

  1. Use the CMS Error Message: Sometimes, the error message gives clues. For example, it might mention incorrect credentials or a server issue. Read the message carefully to understand where to start.
  2. Check Server Logs: Look at your server’s error logs. These logs often show detailed information about what went wrong, like a failed connection or a missing file.
  3. Test the Database Connection Manually: You can test if the database is reachable by running a simple PHP script. Here’s an example:
<?php
  // Load WordPress configuration
  require_once('wp-config.php');

  // Attempt database connection
  $connection = new mysqli(DB_HOST, DB_USER, DB_PASSWORD, DB_NAME);

  // Check the connection
  if ($connection->connect_error) {
    die("Database connection failed: " . $connection->connect_error);
  } else {
    echo "Database connection successful!";
  }

  // Close the connection
  $connection->close();
?>

Replace “localhost,” “username,” “password,” and “database_name” with your database details. If the script fails, the issue is likely with the database connection.

  1. Contact Your Hosting Provider: If you can’t find the problem, reach out to your hosting provider. They can check if the server is down or if there’s an issue with your hosting plan.

By following these steps, you can pinpoint the cause and take action to fix the error.

Step-by-Step Guide to Fix the Error

When you see the “Error Establishing a Database Connection,” follow these steps to fix it:

Step 1: Verify Database Credentials

Check if your website has the correct database details.

  • Open your website’s configuration file. In WordPress, this is the wp-config.php file.

Look for these lines:

define( 'DB_NAME', 'your_database_name' );
define( 'DB_USER', 'your_database_user' );
define( 'DB_PASSWORD', 'your_database_password' );
define( 'DB_HOST', 'localhost' ); // Or your database host
  • Make sure the database name, username, password, and hostname match your hosting account.
Step 2: Check the Database Server Status

Ensure the database server is running and reachable.

  • Use a tool like ping or a PHP connection script to test the server.
  • If the server doesn’t respond, check for high traffic or server issues.
Step 3: Repair a Corrupted Database

If the database is corrupted, repair it.

For WordPress, add this line to wp-config.php:

define('WP_ALLOW_REPAIR', true);
  • Go to http://yourwebsite.com/wp-admin/maint/repair.php to run the repair.
  • Alternatively, use phpMyAdmin to repair the database tables.
Step 4: Resolve Hosting Resource Issues

If your hosting plan is overloaded, fix resource problems.

  • Check if your site is using too much bandwidth, storage, or CPU.
  • Consider upgrading to a plan with higher limits if needed.
Step 5: Disable Plugins and Themes

A plugin or theme might be causing the problem.

  • Disable all plugins through your hosting file manager by renaming the plugins folder.
  • Switch to a default theme by renaming the theme folder.
  • Test your site. If it works, re-enable plugins and themes one at a time to find the issue.
Step 6: Update Core Files

Replace any corrupted website files.

  • Download a fresh version of your CMS (e.g., WordPress).
  • Replace core files except for the configuration file and the wp-content folder.
  • Always back up your site before making changes.
Step 7: Contact Hosting Support

If the error persists, ask your hosting provider for help.

  • Explain the issue and steps you’ve tried.
  • Share any error logs or screenshots to help them identify the problem.

By following these steps, you can fix the error and restore your website. If you’re unsure, don’t hesitate to get professional support!

Preventing the Error in the Future

Avoiding the “Error Establishing a Database Connection” is easier when you take a few precautions. Here’s how you can keep your website running smoothly:

1. Regular Database Backups
  • Back up your database regularly to avoid losing data.
  • Use plugins or hosting tools that automate backups.
  • Keep multiple copies of backups in safe locations, like cloud storage.
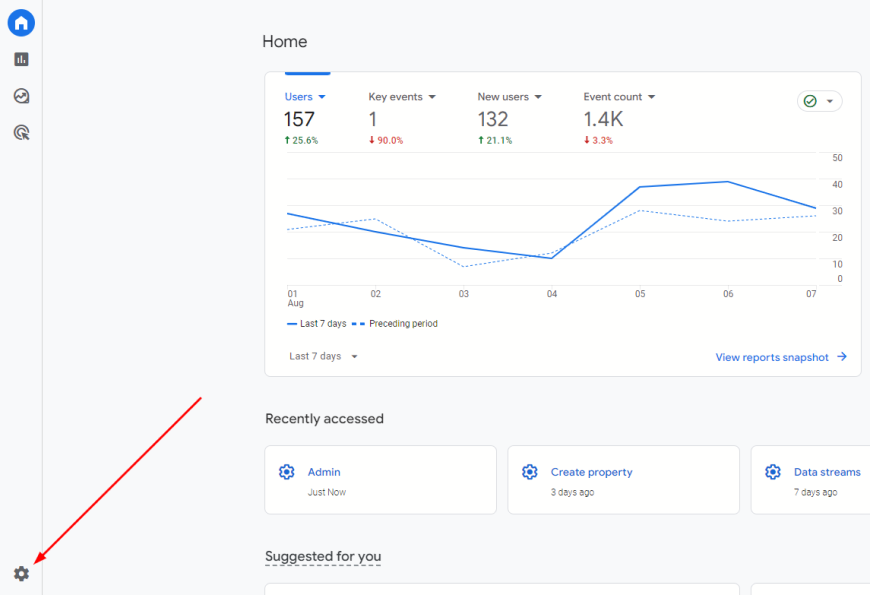
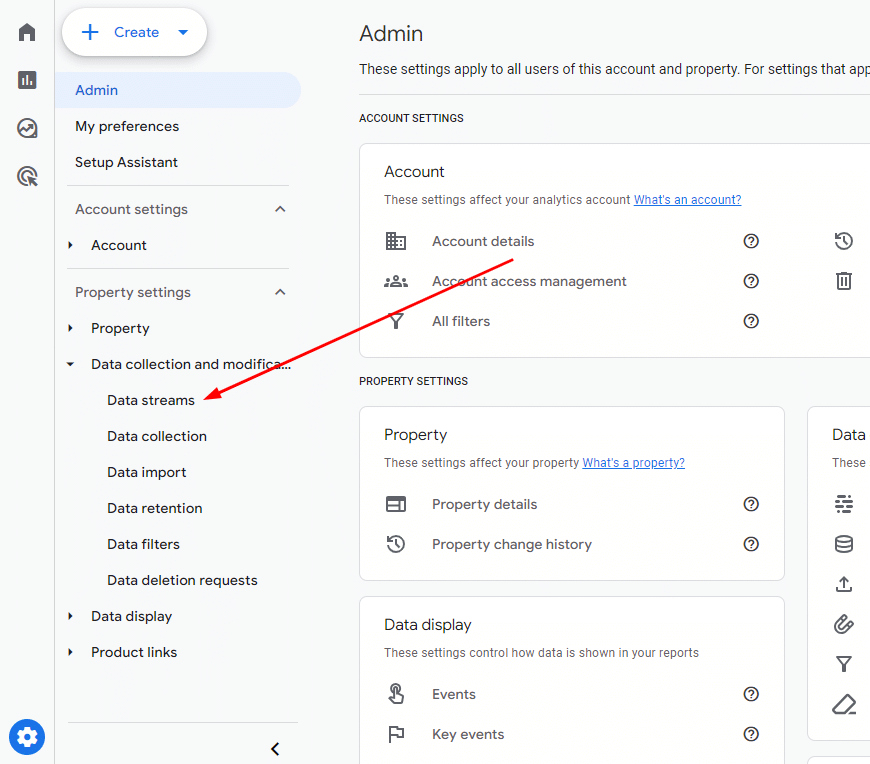
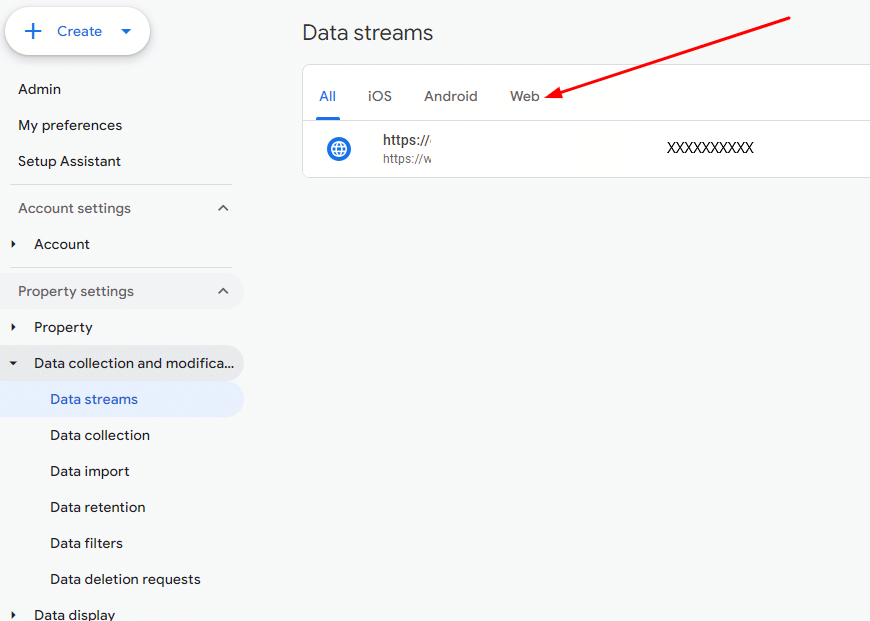
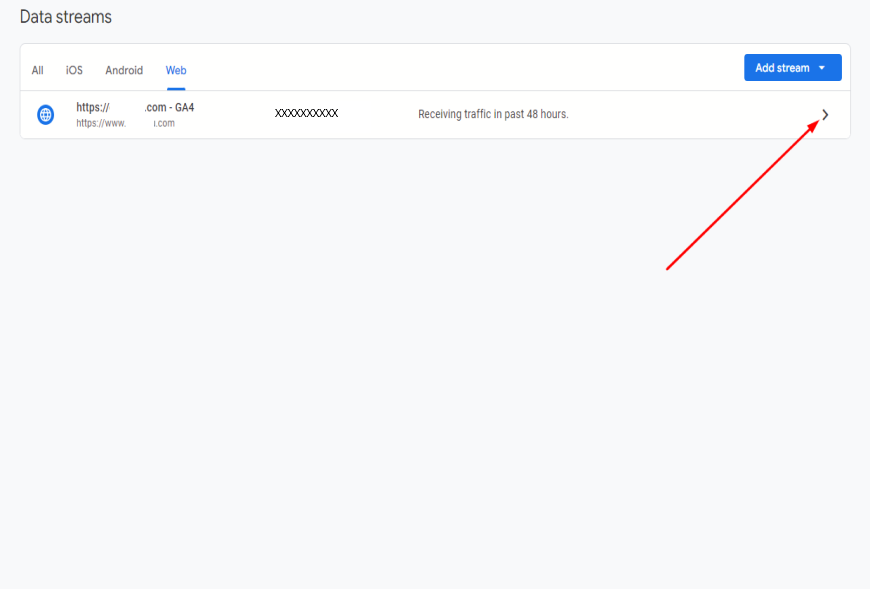
2. Monitor Website Traffic
  • Keep an eye on your website traffic, especially during peak times.
  • Use tools like Google Analytics to track traffic patterns.
  • Upgrade your hosting plan if your site is growing and needs more resources.
3. Keep Everything Up-to-Date
  • Update your CMS, plugins, and themes regularly.
  • Outdated software can cause bugs or conflicts with the database.
  • Check for compatibility before installing updates.
4. Choose a Reliable Hosting Provider
  • Use a hosting provider with a strong reputation for uptime and support.
  • Pick a plan that fits your site’s needs and can handle growth.
  • Reliable hosting minimizes server-related errors.

Tools and Resources to Help You

When dealing with the “Error Establishing a Database Connection,” the right tools and resources can make troubleshooting easier. Here are some helpful options:

Tools for Database Management and Repair

  • phpMyAdmin: A popular tool for managing and repairing your database. Most hosting providers include it in their control panels.
  • Adminer: A lightweight database management tool that’s simple to use and great for quick fixes.
  • Backup Plugins: Plugins like UpdraftPlus or WP Database Backup can help restore your database if needed.

Hosting Provider Support Pages

  • Most hosting providers offer detailed guides and tutorials for common database issues.
  • Check your hosting provider’s help center for troubleshooting steps or contact their support team.

CMS Documentation

  • WordPress Documentation: The WordPress support site has a section dedicated to database errors and their solutions.
  • Other CMS Guides: Platforms like Joomla or Drupal have similar troubleshooting resources available online.
Pro Tip

Bookmark these tools and resources for quick access. They can save you time when troubleshooting database problems. With the right help, you can fix issues and prevent them from happening again!

Understanding the “Error Establishing a Database Connection” is key to resolving it quickly and keeping your website running smoothly. Most of the time, the issue can be fixed with simple troubleshooting steps like checking credentials, repairing the database, or updating files. Staying proactive by maintaining your site and monitoring its health can help prevent such errors in the future.If you need help, Chetaru offers expert WordPress Maintenance Services and Hacked Site Repair Services to ensure your website stays secure and functional. Contact us today to get started!

The Ultimate Guide to Local SEO Best Practices in 2025

Local SEO is all about helping businesses show up in search results when people nearby are looking for their products or services. If you own a shop, a restaurant, or any local service, local SEO makes sure your business is visible to your community online. It’s like putting a bright sign on your storefront but for search engines.

Over the years, local SEO has become more refined. Search engines are now smarter and better at understanding what customers want. In 2025, the competition is tougher, and the strategies to stay visible have evolved. People rely heavily on search engines to find what they need quickly, often on their phones. Keeping your business easy to find in local searches is no longer optional—it’s essential.

This blog will guide you through the best local SEO practices for 2025. These tips are simple and effective, helping you connect with more local customers and grow your business. Let’s get started!

Optimize Your Google Business Profile (GBP)

Your Google Business Profile (GBP) is a powerful tool to help your business stand out in local searches. When people search for products or services nearby, GBP makes it easy for them to find your business. It shows your address, phone number, hours, and even customer reviews. This is often the first impression potential customers have of your business.

Keeping your GBP details accurate is very important. Make sure your name, address, and phone number (NAP) are correct and match everywhere online. Add your business hours and update them if they change. Use the description section to clearly explain what you offer.

Take advantage of all the features GBP provides. Post updates about new products, sales, or events. Use the FAQs section to answer common questions customers might have. Upload photos regularly to show off your business, products, or services. High-quality images help build trust and attract more customers.

Customer reviews are key to building your reputation. Encourage happy customers to leave reviews, and always respond to them, whether they’re positive or negative. A quick, polite reply shows that you care about your customers and take their feedback seriously.

Prioritize Localized Keywords

Localized keywords are phrases people use when searching for services or products in a specific area. For example, “pizza near me,” “plumber in Sydney,” or “best hair salon in Melbourne” are localized keywords. These phrases include location details, helping search engines connect users to nearby businesses.

To find the right keywords, start with tools like Google Keyword Planner or Ubersuggest. Look for phrases that combine your service or product with your location. For example, if you own a bakery in Brisbane, keywords like “Brisbane bakery” or “fresh bread Brisbane” might work well.

Integrate these keywords naturally into your website. Use them in headings, product descriptions, and blog posts. Add them to your meta descriptions and alt text for images. Avoid overusing them—keep the flow natural. This helps search engines understand your business while keeping your content easy to read.

Using localized keywords ensures your website connects with the right audience in your area.

Create Location-Specific Landing Pages

Having a separate landing page for each location you serve helps you reach more local customers. These pages let search engines and people know exactly where you operate and what you offer in each area.

For each page, include the basics: your location’s name, address, and phone number. Add unique details like business hours, services specific to that area, and local photos. Write content that speaks directly to customers in that location. For example, highlight how your services meet their local needs or preferences.

A good example is a chain of gyms. Each gym’s page might list classes, trainers, and promotions available at that specific location. Another example is a plumbing service with pages for each suburb it serves, detailing the response times and common services in those areas.

Leverage Voice Search Optimization

Voice search is becoming more popular as people use smart speakers and mobile assistants to find information. Instead of typing, they ask questions like, “Where’s the nearest coffee shop?” or “What time does the bakery open?”

To optimize for voice search, focus on conversational queries. Write content in a natural, question-and-answer style. For example, include FAQs like “What services do you offer in Sydney?” or “How late are you open on weekends?” These match how people speak.

Use structured data (schema markup) to help search engines understand your content better. Add details like your business hours, location, and services. This makes it easier for search engines to display your business for voice queries.

Focus on Mobile-First Optimization

Most local searches happen on mobile devices. People use their phones to quickly find nearby stores, restaurants, or services. A slow or hard-to-navigate website can make them leave and choose a competitor.

Improve your mobile site speed by compressing images and reducing unnecessary code. Use tools like Google’s PageSpeed Insights to check and fix loading issues. Keep your layout simple so users can easily find key information like contact details or directions.

Responsive design is essential. It ensures your website looks good and works smoothly on all screen sizes. For local businesses, this helps you deliver a better experience and keep customers engaged.

Enhance Local Link Building

Local link building means getting other local websites to link to your business. These links show search engines that your business is trusted in the local community, improving your ranking in local search results.

To build links, partner with nearby businesses, local news sites, or community organizations. For example, sponsor events or collaborate with local blogs to write about your services. You can also join local business directories for more exposure.

Effective strategies include writing guest posts for local blogs, donating to charities, or sharing updates with local media. These links not only boost your SEO but also help you connect with your community.

Use Structured Data Markup

Schema markup is a type of code added to your website that helps search engines understand your content better. It boosts your local SEO by displaying details like your business hours, location, and reviews directly in search results, making it easier for customers to find you.

For local businesses, use the LocalBusiness schema to show your address, phone number, and opening hours. The Event schema works well if you host local events, and the Product schema highlights the items you sell.

To implement schema

  1. Use Google’s Structured Data Markup Helper.
  2. Select the schema type and highlight the relevant information on your page.
  3. Generate the code and add it to your website’s HTML.
  4. Test it using Google’s Rich Results Test tool.

Schema markup helps your business stand out in search results, improving your visibility and attracting more local customers.

Optimize for “Near Me” Searches

“Near me” searches, like “coffee shop near me,” are becoming more common as people look for nearby services on the go. These searches are often location-based, so your business needs to be easy to find.

Include “near me” phrases naturally in your website content. For example, use phrases like “Find the best pizza near me” in blogs or FAQs. Avoid stuffing these phrases; focus on making them fit smoothly into helpful content.

Keep your business information accurate and consistent across all platforms. Update your Google Business Profile with the correct address, phone number, and hours. This helps search engines connect your business with “near me” searches, leading more customers to your door.

Maintain Consistency in NAP Citations

NAP stands for Name, Address, and Phone number. These are the basic details of your business that appear on your website, directories, and social profiles. Consistent NAP information helps search engines trust your business and improves your local SEO.

Make sure your NAP details are exactly the same everywhere online. Even small differences, like abbreviating “Street” as “St.” in one place and spelling it out in another, can confuse search engines.

Use tools like BrightLocal, Moz Local, or Yext to check and update your NAP citations across platforms. Keeping your information consistent ensures customers can easily find and contact your business, boosting trust and visibility.

Leverage Customer Reviews and Ratings

Customer reviews play a big role in local SEO. Positive reviews improve your rankings and build trust with new customers. People often choose businesses with good ratings over those with none or low scores.

To collect reviews, ask customers after they’ve had a great experience. Provide easy links to review sites like Google or Yelp. Display review requests on receipts, emails, or at checkout.

Respond to reviews quickly. Thank customers for positive feedback and address concerns in negative reviews politely. This shows you care about your customers.

Encourage reviews by offering reminders and making the process simple. Happy customers are more likely to share their experiences if asked directly. Strong reviews help your business grow and stand out locally.

Invest in Localized Content Marketing

Localized content helps you connect with your community by addressing their specific needs and interests. It shows that your business understands and cares about the local area.

Create blogs about local events, guides for nearby attractions, or tips related to your products or services in the area. For example, a landscaping company could write about “Best Plants for Brisbane Gardens” or share a video on local gardening tips.

Use storytelling to engage your audience. Share customer success stories or highlight how your business has helped the local community. This builds trust and makes your content more relatable.

Localized content not only attracts local customers but also strengthens your presence in search results. It’s a powerful way to grow your business.

Implement AI for Personalized Experiences

AI tools are changing the way businesses approach local SEO. They help you analyze customer behavior, predict needs, and create tailored experiences that improve engagement.

Use AI to offer personalized product or service recommendations based on customer preferences and location. For example, an AI-powered chatbot can answer local questions like “What’s your delivery time in Sydney?” or suggest products popular in a specific area.

AI also enhances customer experiences with features like voice search optimization, real-time assistance, and smart analytics. For example, local restaurants can use AI to recommend dishes based on seasonal trends or past orders.

By integrating AI, you can create a more personal connection with your customers, boosting satisfaction and loyalty.

Monitor Local SEO Metrics

Tracking local SEO metrics helps you understand what’s working and where to improve. Focus on key metrics like website traffic, keyword rankings, and engagement on your Google Business Profile (GBP). For example, check how many people call or request directions from your GBP.

Use tools like Google Analytics to monitor local traffic and Google Search Console to track keyword performance. GBP Insights shows how customers find your business and what actions they take, such as visits or calls.

Adapt your local SEO strategies based on these metrics. If a keyword isn’t performing, update your content. If fewer people are clicking on your GBP, refresh it with new photos or posts. Regular monitoring keeps your local SEO efforts effective.

Focus on Video and Visual Content

Videos and visuals grab attention and improve engagement. They make it easier for local customers to connect with your business and understand what you offer.

Create videos like store tours, product demos, or customer testimonials to showcase your services. For example, a restaurant can post a video of their kitchen or signature dishes. A salon can share styling tips or client transformations.

High-quality images are just as important. Use clear and appealing photos on your Google Business Profile (GBP) and social media. Pictures of your storefront, team, or events make your business more relatable and trustworthy.

Good visuals help your business stand out, build trust, and attract more local customers.

Optimize for Zero-Click Searches

Zero-click searches happen when users find answers directly on the search results page without clicking any links. These are common for local searches like “nearest café” or “store hours,” making them important for local SEO.

To capture these searches, optimize your content for featured snippets and FAQs. Use clear, concise answers to common questions, like “What are your opening hours?” or “Where are you located?” Include structured data markup to help search engines understand your content better.

Tools like Google Search Console and Ahrefs can help identify opportunities by showing which questions people ask. By optimizing for zero-click searches, you make your business visible and accessible without users needing to leave the search page.

Build Community Relationships

Building connections within your community boosts your SEO and earns trust. Partnering with local businesses or sponsoring events helps your brand become more visible and respected.

For example, you can collaborate with a nearby café to offer joint promotions or sponsor a local charity run. These activities often lead to mentions on community websites, boosting your online presence.

Work with local influencers and bloggers to promote your products or services. They can share reviews or recommendations, reaching more people in your area. These relationships not only improve SEO but also strengthen your connection with the community.

Stay Updated on Local SEO Trends

Local SEO changes as search engines update their algorithms. Keeping up with these changes ensures your strategies stay effective. For example, new Google updates might change how local search results are ranked.

Watch what your competitors are doing. Check their keywords, backlinks, and content strategies to find opportunities to improve your own. Tools like SEMrush or Ahrefs can help with this.

Use resources like Google’s Search Central Blog, Moz, and local SEO newsletters to stay informed about trends and best practices. Staying updated helps you adapt quickly and keep your business visible to local customers.

Local SEO is essential for businesses that want to connect with their community and attract nearby customers. By applying the right strategies, like optimizing your Google Business Profile, using localized keywords, and leveraging customer reviews, you can boost your visibility and grow your business. Staying updated and proactive ensures long-term success in an ever-changing digital landscape.

Choose Chetaru for expert SEO solutions tailored to enhance your local visibility and drive measurable business growth.

Best Shopify Alternatives to Consider in 2025

Introduction

Shopify is a popular e-commerce platform allowing people to create online stores and sell products online. However, there are many other e-commerce platforms available that offer similar features and benefits. This article will discuss some of the best Shopify alternatives for your online store.

Need for considering Shopify alternatives.

Consider hiring Shopify Experts to help you explore other options because each platform has strengths and weaknesses, and there might be a better fit for your needs. You can also decide which platform is best for you and your business by exploring other options.

This article will cover the main points you should consider when choosing an e-commerce platform. After, we will highlight some of the best Shopify alternatives based on those criteria. This will include a brief overview of each platform’s features, pricing, and overall user experience.

Reasons to Consider Alternatives to Shopify

While Shopify is a popular and reliable e-commerce platform, there are some limitations to consider when choosing an e-commerce platform. These limitations include limited customization options, high transaction fees, and scalability issues. Additionally, different businesses have different needs, and a different platform may be a better fit depending on the specific needs and goals of the business.

  1. Customization Options: While Shopify offers a range of themes and templates, some users may need help with the customization options. According to Colorlib, only 4.1% of Shopify sites use a custom theme, while most rely on pre-made themes. Additionally, some users have reported needing extensive coding knowledge to make specific design changes or add custom functionality to their Shopify sites. This can limit the creative control that businesses have over their online stores.
  2. Pricing Structure: While Shopify offers different pricing tiers to accommodate different business sizes and needs, some users may find the overall pricing structure to be more expensive than they’d like. According to a website builder expert study, the average monthly cost of using Shopify is $79. At the same time, some of the platform’s competitors offer comparable features and functionality at a lower cost. Additionally, some users may find the transaction fees associated with using Shopify’s payment gateway prohibitive, as these fees can add up over time.
  3. Different Business Needs: Different businesses have different needs regarding e-commerce web design. For example, you’re running a small online store with a limited inventory. In that case, you may only need some Shopify features and functionality. Alternatively, suppose you’re running a large-scale e-commerce operation with complex inventory management needs. In that case, you may need a more robust platform than Shopify can provide. According to a study by Ecommerce Platforms, businesses with less than $100k in annual revenue may be better served by a simpler, more cost-effective platform than Shopify.

How different businesses have different needs, and why a different platform may be a better fit

Different businesses have unique needs and requirements when it comes to e-commerce platforms. For example, a small business selling handmade goods may have different needs than a large corporation selling various products. Some factors that can influence a business’s e-commerce needs include the following:

Size: The size of a business can have a significant impact on its e-commerce needs. Small businesses may only need some of the features and functionality that larger businesses require. In comparison, larger companies may need a more robust platform to handle complex inventory management, multi-channel selling, and more.

Budget: A business’s budget can also affect its e-commerce platform needs. Some businesses may need to prioritize cost-effectiveness over advanced features. In contrast, others may have more flexibility to invest in a more expensive platform.

Industry: A business can also influence its e-commerce needs. For example, companies in the fashion industry may have different requirements than those in the electronics industry regarding inventory management, product catalogs, and website design.

By understanding their unique e-commerce needs, businesses can choose a platform that best fits their goals and budget. For example, a small business with a limited budget and simple product offerings may be better served by a more straightforward platform like Square Online or WooCommerce. In contrast, a more significant business with more complex needs may benefit from a more robust platform like Magento or BigCommerce. Additionally, businesses should consider factors like customer support, ease of use, and scalability when choosing an e-commerce platform that fits their needs.

Top Shopify Alternatives to Consider in 2023

If you’re looking for an alternative to Shopify, several e-commerce platforms offer similar features and functionality. This section will explore some of the top Shopify alternatives for your online store. Each of these platforms has its own strengths and weaknesses. By understanding their features, pricing, and overall user experience, you can decide the best fit for your business.

WooCommerce

WooCommerce is an open-source e-commerce plugin for WordPress. It is a popular alternative to Shopify for businesses looking for a customizable and cost-effective solution. It provides a wide range of features, including customizable product listings, flexible shipping options, robust payment processing, and a vast library of extensions and themes that can be tailored to suit the needs of individual businesses. This section will discuss the pros and cons of using WooCommerce as a Shopify alternative and its pricing, features, and industry-specific recommendations.

WooCommerce best alternative to shopify

WooCommerce Pros: 

Here are some of the pros of using WooCommerce as an alternative to Shopify:

  1. Flexibility: WooCommerce is highly flexible and customizable, so you can modify your online store to your needs and requirements. This can benefit businesses with unique product offerings or require a high degree of customization in their online store.
  2. Low Cost: One of the major advantages of using WooCommerce is that it is a free platform, meaning you can get started with minimal upfront costs. While some additional costs are associated with using WooCommerce (such as web hosting and payment processing fees), these costs are typically lower than what you would pay for Shopify.
  3. Open-Source: Because WooCommerce is an open-source platform, you can access various resources and community support. This can be especially helpful if you have questions or need assistance customizing your online store.
  4. Integration with WordPress: WooCommerce is built on WordPress, which integrates seamlessly with other WordPress plugins and tools. This can be especially helpful if you already use WordPress for your business website or blog.
  5. Large User Community: WooCommerce has a large user community, meaning you can access a wealth of resources and support when using the platform. This can include tutorials, forums, and other online resources.

Overall, WooCommerce is a highly flexible and cost-effective Shopify alternative, especially for businesses that need a high degree of customization and authority over their online store.

WooCommerce  Cons/Limitations: 

While WooCommerce has many advantages, there are also some limitations and potential drawbacks to consider:

  1. Technical knowledge Required: WooCommerce is built on WordPress and requires some technical setup, so it may only be the best choice for businesses with technical expertise. Setting up and maintaining a WooCommerce site may require some knowledge of custom WordPress website design and development, which can be a barrier to some companies.
  2. Scalability: While WooCommerce is a powerful platform, there may be better choices for high-traffic e-commerce sites. As your site boost and your traffic increases, you may need to invest additional resources and infrastructure to keep your site running smoothly.
  3. Plugin Compatibility: Because WooCommerce is built on WordPress and relies on third-party plugins for many features, compatibility issues can sometimes arise between different plugins. This can be frustrating to troubleshoot and may require technical support.

While WooCommerce is a powerful and flexible platform, some businesses may have better choices. 

Comparison to other platforms

Compared to other e-commerce platforms, WooCommerce has unique advantages and disadvantages regarding pricing, features, and customization options. Here is a brief comparison of WooCommerce to some other popular e-commerce platforms:

  1. Shopify: Shopify is a more expensive platform than WooCommerce, but it offers a wider range of features and is easier to set up and use. However, Shopify may be less customizable than WooCommerce and may not be the best choice for businesses with complex needs.
  2. Magento: Magento is a more robust and scalable platform than WooCommerce. It is also more complex and challenging to set up and maintain. Magento may be better for larger businesses with high traffic volumes and complex inventory management needs.
  3. BigCommerce: BigCommerce is a platform similar to Shopify in terms of pricing and features, but it may offer more customization options and flexibility than Shopify. However, BigCommerce may also be more expensive than WooCommerce and require more technical expertise to set up and maintain.

Industry/Niche-specific recommendations

WooCommerce can be a good choice for many industries and niches, but some may benefit more than others. Here are some examples:

  1. Small businesses with limited budgets: WooCommerce’s low cost and flexibility make it a perfect choice for small businesses needing more resources to invest in an e-commerce platform. With WooCommerce, businesses can get started with minimal upfront costs and scale up as they grow.
  2. Creative industries: WooCommerce’s flexibility and customization options make it a good choice for businesses in creative industries, such as artists, designers, and musicians. These businesses may have unique product offerings and want to create a visually stunning online store that reflects their brand and style.
  3. Non-profits: Non-profit organizations can benefit from WooCommerce’s low cost and flexibility and its integration with WordPress. Non-profits can use WooCommerce to sell merchandise or collect donations. They can customize their online store to reflect their brand and mission.
  4. Local businesses: WooCommerce’s integration with WordPress can make it easy for local businesses to create an online store that complements their existing website. This can be especially beneficial for businesses that want to offer online ordering or curbside pickup options.
  5. Service-based businesses: While WooCommerce is primarily designed for selling physical products, it can also be used to sell digital products and services. Service-based businesses, such as consultants, coaches, and freelancers, can use WooCommerce to sell digital products like e-books or courses.

BigCommerce

BigCommerce is an e-commerce platform offering an all-in-one solution for businesses selling their products online. It provides a range of features, including multi-channel selling, flexible shipping options, and advanced analytics, making it a popular Shopify alternative for businesses with complex needs. Additionally, BigCommerce offers a user-friendly interface and a wide range of customizable themes and integrations that suit the needs of individual businesses. 

best shopify alternatives in 2023

BigCommerce Pros: 

Here are some of the pros of using BigCommerce as an alternative to Shopify:

  1. Scalability: BigCommerce is a highly scalable platform that can grow with your business. Whether you’re just a startup or have an established online presence, BigCommerce can accommodate your needs and scale up as your business grows.
  2. Customization: BigCommerce offers a range of customization options, including pre-built templates and the ability to create custom designs. This can be especially beneficial for businesses that like to create a unique online store that reflects their brand and style.
  3. Built-In Features: BigCommerce offers a range of built-in features that can save you time and money. These include features like multi-channel selling, product reviews, and abandoned cart recovery, which can help you improve your conversion rates and customer retention.
  4. Payment Gateways: BigCommerce offers many payment gateway options, including PayPal, Stripe, and Square. This can make it easy for businesses to accept various payment methods and ensure a smooth customer checkout experience.

BigCommerce Cons/Limitations: 

While BigCommerce has many advantages, there are also some limitations and potential drawbacks to consider:

  1. Higher Cost: One of the main disadvantages of using BigCommerce is that it can be more expensive than other e-commerce platforms, including WooCommerce. While BigCommerce offers a range of features and built-in tools, businesses may need to pay more for these features.
  2. Technical knowledge Required: Like many e-commerce platforms, BigCommerce may require technical knowledge to fully utilize its features. This can be a barrier for businesses without technical expertise or the resources to hire a developer or agency.
  3. Customization Limitations: While BigCommerce offers a range of customization options, some businesses may find that the platform has limitations in terms of design and functionality. This can be especially frustrating for businesses with unique product offerings or requiring high customization in their online store.

While BigCommerce is a robust and scalable e-commerce platform, some businesses may have better choices. If you’re looking for a cost-effective and easy-to-use platform, or if you don’t have technical expertise, consider other alternatives. 

Comparison to other platforms

Compared to other e-commerce platforms, BigCommerce has some unique advantages and disadvantages regarding pricing, features, and customization options. Here is a brief comparison of BigCommerce to some other popular e-commerce platforms:

  1. Shopify: BigCommerce has similar pricing and features but may offer more customization options and flexibility than Shopify. However, BigCommerce may be more expensive than other platforms, including WooCommerce.
  2. WooCommerce: WooCommerce is a free platform that is more cost-effective than BigCommerce. However, WooCommerce may require more effort to set up and maintain and offer fewer built-in features and tools than BigCommerce.
  3. Magento: Magento is a more complex and robust platform than BigCommerce. It may also be more challenging to set up and maintain. Magento may be better for larger businesses with complex inventory management needs.

Industry/Niche-specific recommendations

BigCommerce is a highly customizable and feature-rich e-commerce platform that can benefit businesses in various industries and niches. Here are some examples:

  1. Retail and E-commerce: BigCommerce offers a range of built-in features and integrations to help retail and e-commerce businesses streamline their operations and improve their online sales. For example, BigCommerce offers integrations with popular marketplaces like Amazon and eBay and tools for inventory management and order fulfillment.
  2. B2B and Wholesale: BigCommerce offers a range of B2B and wholesale-specific features, such as custom pricing, account management, and quote management. These features can benefit businesses that sell to other companies or require a high degree of customization in their sales process.
  3. Fashion and Apparel: BigCommerce offers a range of customizable themes and design options, which can be especially beneficial for businesses in the fashion and apparel industry. Additionally, BigCommerce offers features like size and color swatches, which can help enterprises to showcase their products and improve the customer experience.
  4. Food and Beverage: BigCommerce offers features like custom order forms and subscription management, which can be helpful for businesses in the food and beverage industry. BigCommerce offers integrations with popular food delivery services like GrubHub and DoorDash.
  5. Electronics: BigCommerce offers features like advanced product filtering and specifications, which can benefit businesses in the electronics industry. BigCommerce offers integrations with popular payment gateways like PayPal and Stripe, which can help businesses accept various payment methods.

Magento

Magento is a powerful and highly customizable e-commerce platform suitable for businesses of all sizes. It offers a wide range of features, including advanced SEO optimization, flexible pricing and promotions, and robust product management tools, making it a popular Shopify alternative for businesses with complex needs. Additionally, Magento web design provides high customization and scalability, allowing companies to tailor their online store to their specific needs and goals. 

magento a best alternative to shopify for big industries

Magento Pros: 

Here are some of the pros of using Magento as an alternative to Shopify:

  1. Customization: Magento is highly customizable, meaning you can tailor your online store to your needs and requirements. This can be especially beneficial for businesses with unique product offerings or requiring a high degree of customization in their online store.
  2. Scalability: Magento is a highly scalable platform that can grow with your business. Whether you’re just starting out or have an established online presence, Magento can accommodate your needs and scale up as your business grows.
  3. SEO Features: Magento offers a range of built-in SEO features to help your online store rank higher in search engine results. These features include URL optimization, meta-tag management, and sitemap generation.
  4. Advanced Features: Magento offers a range of advanced features, including product bundling, custom pricing, and advanced inventory management. These features can benefit businesses with complex product offerings or sales processes.

Overall, Magento is a highly customizable and scalable e-commerce platform that can be a good choice for businesses with complex needs and a high degree of flexibility. 

Magento Cons/Limitations: 

While Magento has many advantages, there are also some limitations and potential drawbacks to consider:

  1. Technical knowledge Required: Because Magento is a more complex and advanced platform, it may require some technical knowledge to set up and maintain. This can be a barrier for businesses without technical expertise or the resources to hire a developer or agency.
  2. Cost: Magento may be more expensive than other e-commerce platforms, including WooCommerce and BigCommerce. This can disadvantage smaller businesses that may need more resources to invest in an e-commerce platform.
  3. Complexity: While Magento offers a range of advanced features and customization options, it may be too complex for some businesses. This can be incredibly frustrating for businesses starting out or with limited technical resources.

While Magento is a powerful and highly customizable e-commerce platform, some businesses may have better choices. If you’re looking for a platform that is easy to set up and maintain or has limited technical resources, consider other alternatives.

Comparison to other platforms: 

Unlike other e-commerce platforms, Magento has unique advantages and disadvantages regarding pricing, features, and customization options. Here is a brief comparison of Magento to some other popular e-commerce platforms:

  1. Shopify: Shopify is a more user-friendly platform than Magento and may be a better choice for businesses that are just starting out or have limited technical expertise. However, Magento may offer more advanced features and customization options than Shopify and may be better for larger businesses with complex needs.
  2. WooCommerce: WooCommerce is a free platform built on WordPress, making it a more cost-effective option than Magento. However, Magento may offer more advanced features and scalability than WooCommerce and may be a better choice for businesses requiring high customization and flexibility.
  3. BigCommerce: BigCommerce is similar to Magento in pricing and features but may offer more built-in tools and integrations. However, Magento may be more customizable than BigCommerce and a better choice for businesses with unique needs or requirements.

Overall, Magento is a highly customizable and feature-rich e-commerce platform that can be a good choice for businesses with complex needs and a high degree of flexibility. However, businesses should also consider other e-commerce platforms based on their needs and requirements.

Industry/Niche-specific recommendations

Magento is a powerful and highly customizable e-commerce platform that can benefit businesses in various industries and niches. Here are some examples:

  1. Large retailers and e-commerce businesses: Magento’s scalability and advanced features make it an ideal choice for larger retailers and e-commerce businesses. It’s customizable design and advanced inventory management tools can help these businesses streamline their operations and improve their online sales.
  2. Fashion and Apparel: Magento’s customizable design options and built-in features like size and color swatches make it an excellent choice for businesses in the fashion and apparel industry. Magento’s advanced product filtering and specifications can help these businesses showcase their products and improve the customer experience.
  3. B2B and Wholesale: Magento offers a range of B2B and wholesale-specific features, such as custom pricing, account management, and quote management. These features can benefit businesses that sell to other businesses or require a high degree of customization in their sales process.
  4. Electronics: Magento’s advanced features, including product bundling and advanced inventory management, can benefit electronics businesses. Additionally, Magento offers integrations with popular payment gateways like PayPal and Stripe, which can help enterprises to accept various payment methods.
  5. Food and Beverage: Magento’s custom order forms and subscription management tools can be helpful for businesses in the food and beverage industry. Additionally, Magento offers integrations with popular food delivery services like GrubHub and DoorDash.

Overall, Magento can be a good choice for businesses in a wide range of industries and niches. Especially those that require a high degree of customization and flexibility in their e-commerce operations. Its advanced features and scalability make it a powerful tool for businesses that want to improve their online visibility and sales.

Wix

Wix is a famous website builder that has emerged as a viable alternative to Shopify for businesses looking for an e-commerce platform. It offers a user-friendly drag-and-drop editor, a wide range of features, and affordable pricing plans that can benefit businesses of all sizes. It also provides a variety of customizable templates and design options, which can help companies to create a unique online store that reflects their brand and style. 

Wix an alternative platform for ecommerce website

Wix Pros: 

Wix is a popular website builder that also offers e-commerce capabilities. Here are some of the pros of using Wix as a Shopify alternative:

  1. Ease of Use: Wix is known for its user-friendly drag-and-drop editor, making it easy for businesses to create a professional-looking online store without technical expertise.
  2. Affordability: Wix offers a range of affordable pricing plans, which can be especially beneficial for smaller businesses with limited budgets.
  3. Wide Range of Features: Wix offers various features and integrations, including payment options, product galleries, and shipping tools.
  4. Customization: Wix offers a range of customizable templates and design options, which can be especially helpful for businesses that want to create a distinctive online store that reflects their brand and style.

Wix  Cons/Limitations: 

While Wix has many advantages, there are also some limitations and potential drawbacks to consider:

  1. Limited Customization Options: While Wix offers a range of customizable templates and design options, some businesses may find that the platform has limitations in terms of design and functionality. This can be incredibly frustrating for businesses with unique product offerings or requiring a high degree of customization in their online store.
  2. Scalability: While Wix can be a good choice for smaller businesses, it may not suit larger businesses with complex needs. As the business grows and the online store becomes more complex, Wix may only be unable to accommodate some of the business’s needs.
  3. Advanced Features: Wix may offer fewer advanced features than other e-commerce platforms, including Magento and BigCommerce. This can be a disadvantage for businesses that require a high degree of customization or have unique needs.

Comparison to other platforms

Compared to other e-commerce platforms, Wix has unique advantages and disadvantages regarding pricing, features, and customization options. Here is a brief comparison of Wix to some other popular e-commerce platforms:

  1. Shopify: Shopify offers more advanced features and customization options than Wix, but it may be more expensive. Shopify may be a better choice for businesses that require a high degree of customization and flexibility or have more complex needs.
  2. WooCommerce: WooCommerce is a free platform built on WordPress, making it a more cost-effective option than Wix. However, Wix may offer more user-friendly features and design options and maybe a better choice for businesses that need more technical expertise.
  3. BigCommerce: BigCommerce is similar to Wix in pricing and features but may offer more built-in tools and integrations. However, Wix may be more customizable than BigCommerce and better for businesses with unique needs or requirements.

Overall, Wix is a user-friendly and affordable e-commerce platform. It can be a good choice for businesses without technical expertise or those looking for a simple and inexpensive e-commerce solution. However, businesses should also consider other e-commerce platforms based on their needs and requirements.

Industry/Niche-specific recommendations

Wix is a versatile e-commerce platform that can benefit businesses in various industries and niches. Here are some examples:

  1. Arts and Crafts: Wix’s customizable design options and built-in image galleries can benefit businesses in the arts and crafts industry. Additionally, Wix offers integrations with popular payment gateways like PayPal and Square, which can help companies to accept various payment methods.
  2. Beauty and Wellness: Wix’s appointment booking and scheduling tools can be helpful for businesses in the beauty and wellness industry. Additionally, Wix offers integrations with popular marketing tools like Mailchimp and Facebook Ads, which can help these businesses promote their products and services.
  3. Food and Beverage: Wix’s custom order forms and menu management tools can be helpful for businesses in the food and beverage industry. Additionally, Wix offers integrations with popular food delivery services like GrubHub and DoorDash.
  4. Fashion and Apparel: Wix’s customizable design options and built-in product galleries can benefit businesses in the fashion and apparel industry. Additionally, Wix offers integrations with popular shipping services like USPS and FedEx, which can help these businesses manage their shipping and fulfillment processes.

Overall, Wix can be a good choice for businesses in a huge range of industries and niches, especially those that require a user-friendly and affordable e-commerce platform with a wide range of features and customization options. Its integrations with popular payment and marketing tools can also make it a powerful tool for businesses that want to boost their online visibility and sales.

Squarespace

Squarespace is a famous website builder that has become a viable alternative to Shopify for businesses looking for an e-commerce platform. It offers a wide range of features, customizable templates, and integrations that can benefit businesses of all sizes. It also provides a user-friendly interface that makes it easy for businesses to set up and manage their online store without technical expertise. 

Square space is best alternative platform for ecommerce website

Squarespace Pros: 

Squarespace has many advantages as an e-commerce platform. Here are some of the pros of using Squarespace as an alternative to Shopify:

  1. Sleek Design Options: Squarespace offers a range of elegant and customizable templates that can help businesses create a professional-looking online store. The platform also provides a drag-and-drop editor that makes it easy for businesses to customize their website without technical expertise.
  2. Built-in Marketing Tools: Squarespace offers a variety of built-in marketing tools, including email campaigns, social media integrations, and search engine optimization (SEO) features. These tools can help businesses promote their online store and improve their visibility.
  3. Easy to Use: Squarespace is known for its user-friendly interface and intuitive design, making it a good choice for businesses without technical expertise.

Squarespace can be a good choice for businesses that want a user-friendly and customizable e-commerce platform with built-in marketing tools. 

Squarespace Cons/Limitations: 

Limited e-commerce features may not be suitable for businesses with complex needs

While Squarespace has many advantages, there are also some limitations and potential drawbacks to consider:

  1. Limited E-Commerce Features: Squarespace may offer fewer advanced e-commerce features than some other platforms, including Shopify and Magento. This can be a disadvantage for businesses that require a high degree of customization or have unique needs.
  2. Scalability: While Squarespace can be a good choice for smaller businesses, it may not suit larger enterprises with complex needs. As the business grows and the online store becomes more complex, Squarespace may need help to accommodate all of the business’s needs.
  3. Advanced Features: Squarespace may offer fewer advanced features than other e-commerce platforms, including Magento and BigCommerce. This can be a disadvantage for businesses that require a high degree of customization or have unique needs.

While Squarespace can be a good choice for businesses that want a user-friendly and customizable e-commerce platform with built-in marketing tools, some businesses may have better choices. 

Comparison to other platforms

Compared to other e-commerce platforms, Squarespace has unique advantages and disadvantages regarding pricing, features, and customization options. Here is a brief comparison of Squarespace to some other popular e-commerce platforms:

  1. Shopify: Shopify offers more advanced features and customization options than Squarespace, but it may be more expensive. Shopify may be a better choice for businesses that require a high degree of customization and flexibility or have more complex needs.
  2. WooCommerce: WooCommerce is a free platform built on WordPress, making it a more cost-effective option than Squarespace. However, Squarespace may offer more user-friendly features and design options and maybe a better choice for businesses that need more technical expertise.
  3. BigCommerce: BigCommerce is similar to Squarespace in pricing and features but may offer more built-in tools and integrations.

Overall, Squarespace is a user-friendly and customizable e-commerce platform that can be a good choice for businesses without technical expertise or those looking for a simple and affordable e-commerce solution. However, businesses should also consider other e-commerce platforms based on their needs and requirements.

Industry/Niche-specific recommendations

Squarespace is a versatile e-commerce platform that can benefit businesses in various industries and niches. Here are some examples:

  1. Home Goods: Squarespace’s customizable templates and built-in image galleries can benefit businesses in the home goods industry. Additionally, Squarespace offers integrations with popular payment gateways like PayPal and Stripe, which can help businesses accept various payment methods.
  2. Art and Photography: Squarespace’s sleek and customizable design options can be helpful for businesses in the art and photography industry. Additionally, Squarespace offers integrations with popular marketing tools like Mailchimp and Instagram, which can help these businesses promote their products and services.
  3. Music and Entertainment: Squarespace’s audio and video integrations can benefit businesses in the music and entertainment industry. Additionally, Squarespace offers integrations with popular ticketing services like Eventbrite, which can help these businesses sell event tickets.
  4. Wedding and Event Planning: Squarespace’s appointment booking and scheduling tools can be helpful for businesses in the wedding and event planning industry. Additionally, Squarespace offers integrations with popular social media platforms like Pinterest, which can help these businesses promote their services and showcase their work.

Overall, Squarespace can be a good choice for businesses in a broad range of industries and niches, especially those that require a user-friendly and customizable e-commerce platform with a wide range of features and customization options. Its integrations with popular payment and marketing tools can also make it a powerful tool for businesses that want to enhance their online visibility and sales.

Webflow

Webflow is a design-first platform that combines website creation, content management, and e-commerce. It empowers designers and developers to create fully responsive and visually stunning websites without extensive coding knowledge.

Webflow Pros

  • Highly customizable and visually intuitive editor.
  • Built-in hosting with global CDN ensures fast website performance.
  • Excellent SEO features for on-page optimization.
  • Scalable for both small and medium businesses.

Webflow Cons/Limitation

  • Limited pre-designed e-commerce features compared to Shopify.
  • Learning curve for non-designers.
  • Pricing for advanced features can be expensive.

Comparison to Other Platforms

  • Shopify: Webflow is better for design-centric businesses, while Shopify is stronger for quick e-commerce setup with advanced sales tools.
  • WooCommerce: WooCommerce provides more flexibility with plugins and integrations, while Webflow excels in design freedom.
  • Magento: Magento offers extensive scalability for large-scale e-commerce, whereas Webflow focuses on creative freedom and ease of use.

Industry/Niche-Specific Recommendations

Ideal for creative professionals, agencies, and businesses prioritizing unique, high-quality designs for portfolio sites or small to medium-sized online stores.

Shift4Shop

Shift4Shop, previously known as 3dcart, is an all-in-one e-commerce platform offering a robust set of tools for building and managing an online store, with a focus on cost-effectiveness.

Shift4Shop Pros

  • Zero transaction fees.
  • Comprehensive tools, including SEO optimization and marketing features.
  • Multiple free templates for quick store setup.
  • Offers unlimited products and storage even on free plans (for U.S. merchants).

Shift4Shop Cons/Limitation

  • Limited design customization options compared to competitors.
  • User interface may feel outdated for modern users.
  • Less intuitive than platforms like Shopify or Wix.

Comparison to Other Platforms

  • Shopify: Shopify offers a more polished user experience and advanced integrations, but Shift4Shop provides better value for cost-sensitive merchants.
  • WooCommerce: WooCommerce offers more flexibility, whereas Shift4Shop provides an all-in-one approach.
  • Magento: Magento is ideal for enterprise businesses, while Shift4Shop targets small to medium-sized operations with lower budgets.

Industry/Niche-Specific Recommendations

Best for cost-conscious small businesses and U.S.-based merchants looking for a budget-friendly Shopify alternative.

PrestaShop

PrestaShop is an open-source e-commerce platform that enables businesses to build highly customized online stores with extensive functionality.

PrestaShop Pros

  • No licensing fees (open-source).
  • Flexible customization options through modules and themes.
  • Multi-language and multi-currency support.
  • Strong community support with thousands of add-ons available.

PrestaShop Cons/Limitation

  • Requires technical expertise for installation and management.
  • Hosting and security must be managed separately by the user.
  • Costs can add up with premium modules and third-party integrations.

Comparison to Other Platforms

  • Shopify: Shopify is easier to use, while PrestaShop requires technical knowledge but offers more flexibility.
  • WooCommerce: PrestaShop is similar in flexibility but has a steeper learning curve.
  • Magento: Magento offers superior scalability for large stores, whereas PrestaShop caters to medium-scale operations with customization needs.

Industry/Niche-Specific Recommendations

Perfect for mid-sized businesses and international stores requiring multi-language and multi-currency features.

Odoo

Odoo is an integrated suite of business applications, including an e-commerce module, offering end-to-end solutions for managing operations such as CRM, inventory, and accounting.

Odoo Pros

  • All-in-one solution with seamless integration across business operations.
  • Highly customizable with a modular approach.
  • Cost-effective for businesses already using Odoo’s suite of tools.
  • User-friendly interface with modern design.

Odoo Cons/Limitation

  • Implementation can be complex for beginners.
  • Requires technical expertise for customization and scaling.
  • Fewer out-of-the-box e-commerce features compared to Shopify.

Comparison to Other Platforms

  • Shopify: Odoo is better suited for businesses requiring integrated tools beyond e-commerce. Shopify is more specialized for online sales.
  • WooCommerce: WooCommerce excels in flexibility for store creation, while Odoo stands out with its multi-functional approach.
  • Magento: Magento is focused on e-commerce scalability, while Odoo offers broader business application integration.

Industry/Niche-Specific Recommendations

Ideal for businesses looking for an integrated ERP solution alongside e-commerce, especially in industries like manufacturing, wholesale, and services.

Conclusion

Choosing the right e-commerce platform is critical for any business selling products online. This article discusses a few top alternatives to Shopify, including WooCommerce, BigCommerce, Magento, Wix, and Squarespace. Each platform has its own set of pros and cons, and the best choice will depend on the specific needs and requirements of the business.

Businesses need to research and compare different e-commerce platforms before making a decision. This includes evaluating pricing, features, customization options, scalability, and industry-specific recommendations. By finding the right platform, businesses can improve their online visibility, increase sales, and succeed tremendously.

Affiliate World, Dubai 2025

Chetaru is looking forward to its participation in Affiliate World, a premier two-day conference in Dubai, United Arab Emirates, that brings together top affiliate marketers and e-commerce entrepreneurs worldwide. This event is an excellent opportunity for industry professionals to access the latest knowledge and trends, network with like-minded industry experts, and explore new business opportunities.

The conference will cover a comprehensive range of topics, including Facebook Ads, lead generation, e-commerce, native ads, chatbots, and more. With over 120+ advertisers, traffic sources, and networks in attendance, attendees will have ample opportunities to learn from over 20 hours of insider content from leading specialists worldwide.

Meet Chetaru at Affiliate World, Dubai.

Venue: Sheikh Zayed Road, Dubai World Trade Center 9292 Dubai, United Arab Emirates

How to Manage and Optimize Dynamic URLs in Shopify

Dynamic URLs in Shopify pose challenges such as duplicate content, diluted link equity, and user confusion, making them a critical issue for SEO and usability. These URLs often include query parameters (e.g., ?variant=1234), which can lead to duplicate content, dilute link equity, and create confusion for users and search engines alike. In this blog post, we will explore everything you need to know about managing and optimizing dynamic URLs in Shopify to ensure your store runs smoothly and ranks well in search results.

What Are Dynamic URLs?

Dynamic URLs are web addresses that are generated dynamically and often include query parameters, session IDs, or tracking codes. For instance, when a user selects a specific product variant (e.g., size or color) in a Shopify store, the URL might update to reflect the variant, such as https://example.com/product?variant=1234. This helps track the variant selected but can lead to the creation of multiple URLs for the same product page. For example:

  • Static URL: https://example.com/product-name
  • Dynamic URL: https://example.com/product-name?variant=1234

While dynamic URLs can be useful for tracking or variant-specific pages, they often cause issues when they are not managed properly.

Why Are Dynamic URLs Problematic?

  • Duplicate Content: Search engines may see dynamic URLs as separate pages, even if they display the same content.
  • Dilution of Link Equity: If multiple URLs point to the same content, the SEO value of backlinks can be diluted.
  • Confusion for Users: Dynamic URLs are often long and less user-friendly compared to static URLs.

Common Causes of Dynamic URLs in Shopify

In Shopify, dynamic URLs are primarily generated due to the following reasons:

  1. Product Variants: Each product variant (e.g., size, color) generates a dynamic URL with query parameters like ?variant=1234.
  2. Tracking Parameters: URLs may include tracking codes added by marketing campaigns or analytics tools.
  3. Filters and Sorting: Collection pages with filters or sorting options can generate dynamic URLs, such as https://example.com/collection?sort_by=price-ascending.
  4. Third-Party Apps: Apps integrated with your Shopify store may create dynamic URLs for their functionality.

How to Fix and Optimize Dynamic URLs in Shopify

Here are actionable strategies to address dynamic URL issues in Shopify:

1. Use Canonical Tags

Shopify automatically applies canonical tags to pages, which inform search engines about the preferred version of a URL. These tags are critical for SEO because they prevent duplicate content issues by consolidating multiple dynamic URLs into a single, authoritative URL, ensuring that search engines correctly attribute rankings and link equity to the right page. For example, if a product page has multiple dynamic URLs, the canonical tag will point to the main static URL.

Steps to Verify Canonical Tags:

  1. Open your Shopify store in a browser.
  2. Inspect the page source (right-click > View Page Source).
  3. Look for the <link rel=”canonical”> tag.
  4. Ensure it points to the static version of the URL (e.g., https://example.com/product-name).

Pro Tip: If canonical tags are missing or incorrect, you can customize them by editing your theme’s code (theme.liquid or product.liquid).

2. Redirect Dynamic URLs to Static URLs

Use Shopify’s built-in URL redirect feature to consolidate dynamic URLs and direct traffic to the preferred static URL. For example, if a customer accesses a product page using a URL like /product?variant=1234, you can redirect it to /product, ensuring that search engines index only the static version. This improves SEO by consolidating link equity and enhances user experience by providing cleaner, more memorable URLs.

Steps to Create a URL Redirect:

  1. Go to Shopify Admin > Online Store > Navigation > URL Redirects.
  2. Click “Create URL Redirect.”
  3. Enter the dynamic URL in the “Redirect from” field (e.g., /product?variant=1234).
  4. Enter the static URL in the “Redirect to” field (e.g., /product).
  5. Save the redirect.

This ensures users and search engines are always directed to the correct version of your page.

3. Manage URL Parameters in Google Search Console

If your store has many dynamic URLs with query parameters, you can use Google Search Console to control how these parameters are handled.

Steps to Manage URL Parameters:

  1. Open Google Search Console.
  2. Navigate to Settings > Crawl Settings > URL Parameters.
  3. Specify how Google should handle specific parameters, such as ignoring them or consolidating them with the main page.

4. Optimize Internal Linking

Ensure all internal links on your site point to the static version of your URLs. For example, use /product-name instead of /product-name?variant=1234 in:

  • Navigation menus
  • Collection pages
  • Blog posts
  • Footer links

How to Check and Update Links:

  1. Crawl your site using tools like Screaming Frog or Ahrefs.
  2. Identify links pointing to dynamic URLs.
  3. Update these links to the preferred static version.

5. Customize Themes to Avoid Query Parameters

Dynamic URLs often result from product variant selection. You can modify your Shopify theme to avoid appending query parameters to URLs.

Steps to Customize Your Theme:

  1. Go to Online Store > Themes > Edit Code.
  2. Edit the product.liquid or product-template.liquid file.
  3. Use JavaScript or Liquid to dynamically load variant data without changing the URL.
  4. Test the functionality to ensure the user experience is not affected.

This method ensures that users stay on the static product page, even when selecting different variants.

6. Leverage Robots.txt for Unwanted Dynamic URLs

Shopify allows customization of the robots.txt file for Shopify Plus users. You can disallow search engines from crawling unnecessary dynamic URLs.

Example Rule:

User-agent: *

Disallow: /*?variant=

This prevents search engines from indexing URLs with ?variant= parameters, focusing their attention on static URLs instead.

7. Audit Your Sitemap

Shopify automatically generates a sitemap that includes the preferred URLs for your store. To verify that the sitemap has been updated correctly after making changes, navigate to https://yourstore.com/sitemap.xml and ensure the URLs listed reflect the adjustments you’ve made. Additionally, resubmit the sitemap in Google Search Console to help search engines index the updated URLs efficiently. Ensure your sitemap does not include dynamic URLs by:

  1. Navigating to https://yourstore.com/sitemap.xml.
  2. Reviewing the sitemap for unwanted dynamic URLs.
  3. Submitting the sitemap to Google Search Console for better indexing.

8. Use Third-Party Apps for URL Management

Shopify’s App Store offers tools to help manage and optimize URLs. Examples include:

  • SEO Manager: Simplifies URL and SEO settings.
  • Smart SEO: Automates canonical tags and other optimizations.

These apps can provide additional features for managing dynamic URLs efficiently.

9. Monitor and Test Regularly

After implementing fixes, continuously monitor your site for issues:

  • Use Google Search Console to identify crawl errors or duplicate content.
  • Run regular site audits with tools like Ahrefs, SEMrush, or Screaming Frog.
  • Check your analytics to ensure traffic is directed to static URLs.

Key Takeaways

While Shopify’s platform doesn’t allow direct rewriting of dynamic URLs, there are multiple strategies to manage and optimize them:

  • Use canonical tags to guide search engines to the preferred version of your URLs.
  • Redirect dynamic URLs to static URLs using Shopify’s built-in tools.
  • Manage URL parameters effectively in Google Search Console.
  • Customize your theme and optimize internal links for static URLs.
  • Block unwanted dynamic URLs from being indexed using robots.txt.

By taking these steps, you can reduce the impact of dynamic URLs on your SEO and improve the overall user experience for your Shopify store.

Optimizing dynamic URLs is an ongoing process, but it’s essential for the success of your online store. If you’re unsure where to start, consider consulting an SEO expert or a Shopify developer for personalized advice

20 Purple Color Logo

The Power of Purple in Branding

Purple is more than just a color; it’s a statement. Often associated with royalty, luxury, and creativity, purple carries a unique blend of calm stability from blue and fierce energy from red. This dual nature makes it a versatile choice for brands aiming to convey sophistication, mystery, or innovation. Purple logos are visually appealing and evoke deep emotions, helping brands stand out in a crowded market. Let’s explore how some of the most famous brands have harnessed the power of purple in their logos.

The psychology behind the color purple

Here’s the color psychology behind the color purple, presented in points:

  • Royalty and Luxury: Historically linked to nobility and wealth, purple evokes a sense of luxury and exclusivity.
  • Creativity and Imagination: It combines the calm of blue with the energy of red, fostering creativity and innovative thinking.
  • Spirituality and Mystery: Often associated with the mystical, it promotes introspection and spiritual awareness.
  • Wisdom and Power: Symbolizes knowledge and power, making it a strong choice for authoritative branding.
  • Calmness and Ambition: Different shades can evoke either tranquility or a drive for success.

Famous Purple Logos

1. FedEx

FedEx

FedEx is a global shipping giant, and its logo is a masterclass in simplicity and clever design. The purple color represents reliability and trust. The hidden arrow between the “E” and “x” subtly communicates speed and precision, core attributes of FedEx’s brand identity.

2. Taco Bell

Taco Bell

Taco Bell’s logo is playful and vibrant, much like the brand. Its use of purple sets it apart from competitors in the fast-food industry, where red and yellow dominate. Purple symbolizes creativity and originality, which aligns with Taco Bell’s innovative menu offerings.

3. Yahoo

Yahoo

Yahoo’s logo has undergone several changes, but purple remains constant. The color choice represents the brand’s quirky and fun personality. As one of the early internet giants, Yahoo’s purple logo became synonymous with innovation and information.

4. Syfy

Syfy

The Syfy channel’s logo leverages purple to create a futuristic and imaginative vibe. Purple is often associated with the mysterious and the unknown, making it the perfect choice for a brand focused on science fiction and fantasy entertainment.

5. Premier League

The Premier League’s logo uses purple to convey royalty and authority. As one of the most prestigious football leagues in the world, the choice of purple reflects the league’s dominance and elite status in the sports industry.

6. Twitch

Twitch

Twitch, the leading live streaming platform for gamers, uses purple to resonate with its young, tech-savvy audience. Purple signifies creativity and uniqueness, aligning with Twitch’s brand as a platform for content creators and gaming enthusiasts.

7. Crown Royal

Crown Royal

Crown Royal’s logo is steeped in tradition and luxury, making purple the ideal color. The royal hue symbolizes the premium quality of the whiskey, reinforcing its position as a high-end, prestigious brand.

8. Cadbury

Cadbury

Cadbury is one of the most iconic purple logos globally. Purple has become synonymous with the brand’s identity, representing luxury, indulgence, and superior-quality chocolate. Cadbury’s use of purple is so significant that the company has even trademarked its specific shade.

9. Hallmark

Hallmark

Hallmark, known for its iconic purple logo, is a leading brand that celebrates life’s special moments through its extensive collection of greeting cards, gifts, and keepsakes. With a rich heritage in storytelling and emotional connections, Hallmark offers products that inspire people to express their heartfelt sentiments in meaningful ways. Whether for birthdays, holidays, or just because, Hallmark helps make every occasion memorable.

You can also explore our blog on Blue Color Logo, Yellow Color Logo, & Green Color Logo.

10. Milka

Milka’s purple cow logo is instantly recognizable, symbolizing softness, gentleness, and high-quality dairy products. The use of purple helps differentiate Milka from other chocolate brands, emphasizing a unique and gentle approach to branding.

11. Los Angeles Lakers

The Los Angeles Lakers’ purple and gold logo is iconic in sports. In this context, Purple symbolizes the prestige and success of the team, which has a long history of championships and legendary players.

12. Claire’s

Claire’s

Claire’s is a retail brand known for its accessories and jewelry, especially for younger audiences. The purple in Claire’s logo conveys a fun, youthful, and trendy vibe, making it appealing to its target market.

13. NYU (New York University)

NYU (New York University)

NYU’s logo features purple to symbolize wisdom, creativity, and intellectual achievement. As one of the leading educational institutions globally, using purple reinforces NYU’s reputation for academic excellence.

14. Aussie

Aussie

Aussie, a famous haircare brand, uses purple to convey vibrancy and liveliness. The color reflects the brand’s Australian roots, where boldness and individuality are celebrated.

15. BenQ

BenQ

BenQ’s purple logo is modern and sleek, reflecting the brand’s focus on cutting-edge technology and innovation. The choice of purple helps BenQ stand out in the competitive tech industry.

16. Byjus

Byjus

Byjus, an educational technology company, uses purple to symbolize creativity and ambition. The color aligns with the brand’s mission to make learning engaging and innovative.

17. Avid

Avid

Avid’s logo, which is associated with the creative industry, uses purple to signify innovation and imagination. The brand is known for its media production tools, and purple highlights its commitment to creativity.

18. Curves

Curves

Curves, a fitness brand tailored for women, uses purple to convey empowerment and femininity. The color choice resonates with the brand’s focus on creating a supportive and positive environment for women’s health and fitness.

19. E4 Channel

E4 Channel

The E4 Channel, known for its entertainment content, uses purple to create a playful and energetic brand image. In this context, Purple appeals to a younger audience and aligns with the channel’s vibrant and dynamic programming.

20. BabiesRUs

BabiesRUs

BabiesRUs uses a soft shade of purple to create an approachable and gentle brand image. The color choice reflects the brand’s focus on nurturing and care, making it appealing to parents and families.

Best Color Combinations with Purple

Purple is a versatile color that pairs well with various other colors, creating different moods and brand impressions:

  1. Purple and Gold: This combination exudes luxury, royalty, and elegance. It’s ideal for high-end brands or products that want to convey a sense of prestige.
  2. Purple and Silver: Together, purple and silver create a sleek and modern look. This combination works well in technology or fashion branding, where a futuristic or sophisticated image is desired.
  3. Purple and White: Purple paired with white gives a clean, minimalist, and refreshing feel. This is a popular combination in the beauty, wellness, and healthcare industries, where purity and simplicity are essential.
  4. Purple and Black: This bold and dramatic combination often conveys mystery, power, or elegance. It suits luxury brands or those wanting to make a strong, impactful statement.
  5. Purple and Pink: Purple and pink together create a playful, feminine, and vibrant palette. This is often seen in brands targeting younger audiences or products related to fashion, beauty, and accessories.
  6. Purple and Yellow: This contrasting combination is eye-catching and energetic. It’s great for brands that want to stand out and be memorable, offering a lively and dynamic vibe.
  7. Purple and Teal: Purple with teal is a modern, fresh, creative combination. It’s often used in branding for tech, education, or creative industries, where innovation and forward-thinking are essential.

Final Thoughts

Purple logos are not just a visual choice but a strategic branding decision. Purple’s ability to convey luxury, creativity, and uniqueness makes it a popular choice across various industries. Whether it’s FedEx’s innovation, Taco Bell’s playfulness, or the prestige of the Premier League, purple has proven to be a powerful tool in establishing brand identity and fostering emotional connections with consumers.

The best color combinations with purple, such as gold, silver, white, black, pink, yellow, and teal, can further enhance a brand’s visual identity, making it memorable and impactful.

How to Delete a Theme in WordPress

If you’re using WordPress to manage your website, you might need to delete a theme. This could be because you’re cleaning up old themes you no longer use or want to simplify your site’s backend. Whatever your reasons, removing themes can help make your site more efficient and reduce security risks associated with outdated software.

Before you start deleting anything, it’s crucial to back up your website. This means saving a copy of your site’s content and settings just how they are now. Backing up is like taking a snapshot; if anything goes wrong, you can restore your site to how it was before you made any changes. Always remember, better safe than sorry!

Preparing to Delete a WordPress Theme

Checking the Active Theme

First, you need to find out which theme your website is currently using. This is important because you don’t want to accidentally delete the theme that’s making your website look and function correctly. To check your active theme, log in to your WordPress dashboard, go to the Appearance menu, and click Themes. Here, you’ll see all the themes you’ve installed. The theme that is currently active will have a label that says Active.

It’s crucial not to delete this active theme directly from your website because it will leave your site without a proper design and could cause display or functionality problems. If you want to delete the active theme, you should activate a different one. This way, your website will remain operational and look good while you make the change.

Backing Up Your Website

Backing up your website is like keeping a safety net under your digital presence. If anything goes wrong, you can use this backup to get your site back to how it was before making any changes. You should always back up your files and your database because your files include your themes, plugins, and media. In contrast, your database holds your posts, comments, and settings.

There are many tools and plugins available to help you with backups. Some popular options include UpdraftPlus, BackWPup, and VaultPress. These plugins can automatically back up your site to a location like Dropbox, Google Drive, or their own cloud services. Select one that fits your requirements and budget, and set it up to regularly save your website data. This way, you’re always prepared for any situation.

Steps to Delete a WordPress Theme

Accessing the Theme Directory

To delete a theme, first, you need to get to the right place in your WordPress dashboard. Log in to your dashboard, click on Appearance, and then choose Themes. This will take you to the theme directory, where you can see all the themes that you have installed on your website.

Deleting the Theme

Once you are in the Themes section, follow these steps to safely remove a theme:

  1. Hover over the theme you need to delete, and a Theme Details button will appear. Click on it.
  2. A new window will pop up showing details about the theme. There is a Delete link at the bottom right of this window. Click on this link.
  3. A confirmation window become visible asking if you want to delete the theme. Click OK to confirm and delete the theme.

Suppose you can’t delete the theme through the dashboard, perhaps because the delete option is not available or it gives an error. In that case, you’ll need to try another method.

Using FTP to Delete a Theme

If deleting from the dashboard doesn’t work, you can delete the theme using FTP (File Transfer Protocol), which lets you manage your site’s files directly on the server.

  1. First, you require to connect to your website using FTP software. Enter your website’s FTP address, username, and password. You can get this information from your web hosting provider.
  2. Once connected, navigate to the wp-content/themes folder. Here, you’ll see folders for each theme installed on your site.
  3. Find the folder of the theme you need to delete. Right-click on it and choose Delete from the menu. Confirm the deletion.

Using FTP is straightforward, but be cautious. Deleting the wrong file or folder can disrupt your site, so double-check before removing anything.

These steps will help you safely remove any WordPress theme, whether directly through your WordPress dashboard or using FTP.

Post-Deletion Steps

Checking the Site’s Functionality

After you’ve deleted a theme, it’s important to ensure your website works properly. Start by going through your website like a visitor. Check different pages to see if they load correctly and look for any errors. If everything seems fine, remove the theme without affecting your site’s performance.

If you notice any issues like pages not loading or displaying errors, here’s what you can do:

  1. Clean your browser’s cache & try loading the site again.
  2. If the problem persists, check if the active theme is properly set up and compatible with your WordPress version.
  3. If necessary, restore your website using the backup you made earlier. This will bring everything back to how it was before you deleted the theme.

Cleaning Up Unused Database Entries

Sometimes, themes leave behind data in your website’s database, even after they’re deleted. Cleaning this up can help keep your site running smoothly.

To clean up leftover data:

  1. Consider using a plugin like WP-Optimize or Advanced Database Cleaner. These tools can help you safely remove unnecessary data without damaging your website.
  2. Install and activate the plugin, then follow its instructions to scan and clean your database.

Remember, while cleaning up the database is helpful, it’s optional unless you’re experiencing specific issues that require it. Always back up your website before making any changes to the database. This way, you’re keeping your site safe while ensuring it runs at its best.

In this guide, we’ve explored the steps for safely deleting a WordPress theme, including preparations like backups, the deletion process, and post-deletion checks to ensure your site remains in top shape. Keeping your WordPress site streamlined by removing unused themes can significantly enhance its performance and security. Now might be an excellent opportunity to explore new themes or rethink your website’s design to ensure it remains appealing and functional.

If you need help with your website or are considering a new design, don’t hesitate to contact Chetaru, a Custom WordPress design agency. We’re here to assist you with all your web design needs.

How to Find Your Measurement ID in Google Analytics 4: A Step-by-Step Guide

Google Analytics 4 (GA4) is a powerful tool for tracking and analyzing website data, but getting started with it can be a bit confusing. One crucial component you’ll need is your Measurement ID. This unique identifier is essential for linking your GA4 property with your website or app. In this guide, we’ll walk you through the steps to locate your Measurement ID in GA4, ensuring you have everything set up correctly for effective data tracking.

What is a Measurement ID?

The Measurement ID is a unique identifier used in Google Analytics 4 to connect your website or app with your analytics property. Unlike the Tracking ID in Universal Analytics, the Measurement ID is used specifically in GA4 to ensure data flows seamlessly between your site and your GA4 property.

Finding Your Measurement ID

Follow these steps to find your Measurement ID in Google Analytics 4:

1. Log In to Google Analytics

First, you need to access your Google Analytics account. Go to the Google Analytics login page and sign in with your credentials. Make sure you are logged into the correct Google account that has access to your GA4 properties.

2. Access the Admin Section

Once you’re in your Google Analytics account, navigate to the Admin section. You can find this at the bottom-left corner of the Google Analytics interface. Click on the “Admin” gear icon to proceed.

Admin in GA4

3. Select the Correct GA4 Property

In the Admin section, you’ll see three columns: Account, Property, and View. Under the “Property” column, select the GA4 property for which you need the Measurement ID. If you have multiple properties, ensure you choose the one relevant to the website or app you’re working with.

Data streams GA4

4. Locate the Measurement ID

Now that you’ve selected your GA4 property, click on “Data Streams” under the Property column. You’ll be directed to a page where you can see your data streams (Web, iOS, Android). Click on the web data stream if you’re tracking a website.

Web GA4

On the data stream details page, you’ll find your Measurement ID listed prominently at the top, usually in the format “G-XXXXXXXXXX.” Copy this Measurement ID as you’ll need it for setting up tracking on your site.

5. Verify Your Measurement ID

It’s crucial to verify that you’ve copied the correct Measurement ID. Ensure it matches the one listed in the GA4 interface to avoid any tracking issues. Double-check that it’s correctly implemented on your website or app.

Measurement ID in GA4

Common Issues and Troubleshooting

If you encounter issues finding your Measurement ID, consider the following tips:

  • Check Permissions: Ensure you have the necessary permissions to access the GA4 property. If you’re unable to see the Measurement ID, you may need to request access from the account administrator.
  • Verify GA4 Setup: Make sure that your GA4 property is correctly set up. If you only see Universal Analytics properties, you might need to create or switch to a GA4 property.
  • Refresh and Retry: Sometimes, a simple page refresh or logging out and back in can resolve display issues.

Finding your Measurement ID is a key step in setting up Google Analytics 4 for effective data tracking. By following the steps outlined above, you can easily locate this important identifier and ensure your website or app is correctly linked to your GA4 property. Proper setup of your Measurement ID is crucial for accurate analytics and insights, so take the time to verify everything is in place. Happy tracking!

Managing User Access in Google Analytics: Best Practices

Introduction

Google Analytics is a powerful tool for understanding how people interact with your website. To get the most out of it, it would help if you managed who can access and use your data. Properly setting up user permissions ensures that your data stays secure and that team members can do their jobs effectively. This guide will cover the basics of setting up user accounts, assigning roles, and managing access. We’ll also look at handling common problems and securing your account.

Understanding User Roles in Google Analytics

Google Analytics has different user roles to help manage who can see and do what with your data. Here’s a guide to the leading roles you’ll play in Google Analytics:

Administrator

  • What They Can Do: Administrators fully control the Google Analytics account. They can add or remove users, change settings, access all data and reports, and manage account settings and integrations.
  • Best For: This role is usually given to account owners or managers who need complete control.

Editor

  • What They Can Do: Editors can create and modify reports and dashboards. They can also make changes to settings but can’t remove users or make high-level changes to the account.
  • Best For: This role is ideal for team members who need to customize reports or set up tracking but don’t know how to manage user access.

Analyst

  • What They Can Do: Analysts can view all the reports and data but can’t change them. They can create dashboards and access data to analyze performance.
  • This role suits people who need to see and analyze data without changing settings or user management.

Viewer

  • What They Can Do: Viewers can only look at the reports and data. They cannot make changes or create new reports, so their role is very limited.
  • This role is best for users who only need to view data and reports, such as stakeholders or clients who don’t need to interact with the settings.

Setting Up User Permissions: Creating User Accounts

Setting up user accounts in Google Analytics is a straightforward process. Here’s a guide to help you get started:

  • Log In to Google Analytics: First, sign in to your Google Analytics account. You need to have administrator access to add new users.
  • Go to Account Settings: Click on the gear icon (Admin) in the screen’s bottom left corner. This takes you to the Account Settings.
  • Select the Account or Property: The Account, Property, and View columns are in the Admin section. Choose the account or property where you want to add a new user.
  • Add New Users: Click “Account” Settings” under”the Account or Property column. Look for the “Account” Users” or “Property Users” option” and click on it. Click the “Add” b” to” (usually represented by a plus sign or “+ Add.”
  • Enter User Details: Enter the email address of the person you want to add. This should be their Google account email. Choose the user role you want to assign (Administrator, Editor, Analyst, or Viewer) based on what access they need.
  • Set Permissions: Decide if the user should have “Edit” & “Analyze”. You can check the box for email notifications if you want them to receive notifications.

Best Practices for Managing User Access

Managing user access in Google Analytics is essential for keeping your data safe and ensuring everyone has the right level of access. Here are some best practices to follow:

Give the Least Access Necessary

  • What This Means: Only give users the access they need to do their job. For example, if someone only needs to view reports, they should be a Viewer, not an Editor.
  • Why It Matters: This reduces the risk of accidental changes or data breaches.

Review Access Regularly

  • What This Means: Check user access settings often to ensure they are correct. Update or remove access for users who no longer need it.
  • Why It Matters: People move on or change roles and regular reviews help keep your account secure.

Use Groups for Easy Management

  • What This Means: Create groups for teams or departments and assign roles to the whole group instead of individuals.
  • Why It Matters: This makes it easier to manage permissions and ensures everyone in the group has the same access.

Set Up Alerts for Changes

  • What This Means: Configure alerts to notify you if there are any changes to user access or settings.
  • Why It Matters: Alerts help you quickly spot and respond to unauthorized changes or potential issues.

Use Two-Factor Authentication (2FA)

  • What This Means: Enable 2FA to add an extra layer of security when users log in.
  • Why It Matters: 2FA makes it harder for unauthorized people to access your account, even if they have the password.

Keep an Eye on Audit Logs

  • What This Means: Regularly check the audit logs to see who has accessed or changed what in your account.
  • Why It Matters: Audit logs help track activity and spot unusual behavior.

Security Considerations

Keeping your Google Analytics account secure is essential to protect your data. Here are some key security tips:

Enable Two-Factor Authentication (2FA)

  • What This Means: Two-factor authentication adds an extra step when logging in. In addition to entering your password, you need to verify your identity with a code sent to your phone or email.
  • Why It Matters: This makes it harder for someone to hack into your account, even if they have your password.

Use Strong Passwords

  • What This Means: Choose a robust and unique password that is hard to guess. Avoid using simple words or readily available personal information.
  • Why It Matters: Strong passwords help prevent unauthorized access to your account.

Regularly Review User Access

  • What This Means: Check who can access your Google Analytics account and their roles. Remove access for users who no longer need it.
  • Why It Matters: This helps ensure that only the right people can see and change your data.

Monitor Account Activity

  • What This Means: Monitor your account logs to see who is accessing your data and what changes they are making.
  • Why It Matters: Monitoring helps spot suspicious or unauthorized activity quickly.

Set Up Alerts for Unusual Activity

  • What This Means: Configure alerts to notify you of any unusual activity, like changes in user access or settings.
  • Why It Matters: Alerts help you react quickly to potential security issues.

Troubleshooting Common Issues

Sometimes, users may need help with Google Analytics. Here’s Here’s handle common issues:

Users Unable to Access Reports

  • Possible Problem: A user might need the correct permissions or be using the wrong Google account.
  • Solution: Check the user’s user and ensure they have the correct permissions. Also, confirm they are logged into the correct Google account.

Role Conflicts and Misassignments

  • Possible Problem: Users might need to assign a different role, which can limit their access or abilities.
  • Solution: Review the roles assigned to each user and adjust them if needed. For example, if someone needs to edit reports but only has viewing access, change their role to Editor.

Access Issues After Account Changes

  • Possible Problem: Users might face issues accessing the data they need after making changes to account settings or user roles.
  • Solution: Verify that the changes were saved correctly and that users have the correct roles. Double-check their permissions and try reassigning roles if necessary.

Issues with Email Invitations

  • Possible Problem: Users might not receive their invitation to access Google Analytics, or the link might not work.
  • Solution: Ask the user to check their spam or junk folder for the email. If the invitation link doesn’t work, resend it or manually add the user again.

Problems with Viewing Data

  • Possible Problem: Users might see error messages or have trouble loading reports.
  • Solution: Ensure the user has the correct permissions and try clearing their browser cache. If the issue persists, check for any known Google Analytics outages or issues.

Managing user access in Google Analytics is critical to keeping your data safe and ensuring your team has the right tools for their work. By following the best practices for setting up roles and permissions, you can protect your account from unauthorized changes and ensure everyone has the necessary access. Regularly reviewing access, using strong passwords, and monitoring activity will help keep your Google Analytics account running smoothly. With these tips, you’ll be on your way to managing your data effectively and securely.

How to Set Up and Optimize Your Google Analytics Tag

Introduction

Google Analytics is a powerful tool for understanding how visitors interact with your website. Setting up Google Analytics correctly is crucial for getting accurate data about your site’s performance. This data can help you make informed decisions to improve your website and grow your business.

This guide will walk you through the steps to set up and optimize your Google Analytics tag. Whether you’re new to Google Analytics or need a quick refresher, we’ll cover everything you need to know. You’ll learn how to set up the tracking code, customize your settings, and ensure that you’re capturing all the essential data. By the end, you’ll have a well-optimized setup that provides clear insights into your website’s performance.

Understanding Google Analytics

Google Analytics is a free tool that helps you see how people use your website. It collects data about your visitors and shows you valuable reports, helping you understand what’s working on your site and what might need to be improved.

Here’s what Google Analytics can do for you:

  • Track Visitors: You can see how many people visit your site, where they come from, and how long they stay.
  • See What They Do: It shows which pages they visit, what links they click, and what actions they take.
  • Measure Goals: You can set goals, like signing up for a newsletter, and track the number of visitors who complete them.
  • Understand Traffic Sources: You’ll learn if visitors find your site through search engines, social media, or other websites.

By understanding these things, you can make better choices to improve your website, attract more visitors, and achieve your business goals.

Setting Up Your Google Analytics Tag

Step 1: Create a Google Analytics Account

Creating a Google Analytics account is the first step in setting up your tracking. Here’sHere’s how to do it:

  • Go to Google Analytics: Open your web browser and go to the Google Analytics website.
  • Sign In or Create a Google Account: If you already have a Google account (like Gmail), sign in. If not, you’ll you’ll need to create one. Click on “Sign Up” to make a new account.
  • Start Setting Up Google Analytics: Once you’re signed in, click the “Start Measuring” button to begin setting up Google Analytics.
  • Fill in Your Details: You’ll need to provide information about your website. Enter your website’s name, URL, and industry category—You’ll also need to choose your reporting time zone.
  • Get the Tracking Code: After you’ve filled in the details, Google Analytics will give you a tracking code. This code helps Google Analytics collect data from your site.
  • Agree to the Terms: Read and accept the terms of service and data sharing settings.
  • Click on “Create” or “Next” to finish the setup. Then, click on the button to create your Google Analytics account.

Step 2: Install the Google Analytics Tag

Installing the Google Analytics tag on your website is essential for tracking your visitors. Here’s a simple guide to help you do it:

  • Get the Tracking Code: You’ll receive a tracking code after creating your Google Analytics account. This code looks like a long string of text.
  • Open Your Website’s Code: Add the tracking code to your HTML. If you use a website builder like WordPress or Wix, there’s usually a special place to put it. Look for “Header” or “Site Settings.”
  • Add the Tracking Code: Copy the tracking code from Google Analytics. Paste it into your website’s HTML before the closing </head> tag. This means it should be placed in the part of your code that appears at the top of your pages.
  • Save Your Changes: After pasting the code, save the changes to your website.
  • Check the Installation: To ensure the tag works, you can use tools like Google Tag Assistant or Google Analytics’Analytics’ real-time reports. These tools will help you see if your website sends data to Google Analytics.

Step 3: Verify Installation

After adding the Google Analytics tag to your website, it is essential to ensure it works correctly. Here’s how you can verify that your Google Analytics tag is installed correctly:

Use Google Tag Assistant
  • Install the Extension: Add the Google Tag Assistant extension to your web browser. This small tool helps you check whether your tags are working.
  • To activate the Extension, Click on the Tag Assistant icon in your browser and then go to your website.
  • Check for Errors: The Tag Assistant will show if your Google Analytics tag is firing correctly. Look for any errors or warnings.
Check Real-Time Reports in Google Analytics
  • Log In: Go to Google Analytics and log in to your account.
  • Go to Real-Time Reports: Click “Real-Time” in the left menu. This shows you what’s happening on your site right now.
  • Visit Your Website: Open a new tab and go to your website. Your visit should appear in the Real-Time reports.
Use Google Analytics Debugger
  • Install the Extension: Add the Google Analytics Debugger extension to your browser.
  • Activate the Debugger: Click the Debugger icon and refresh your website.
  • Check the Console: Open your browser’sbrowser’s console (usually found in developer tools). Look for any messages related to Google Analytics. This will show if the tag is working.

Optimizing Your Google Analytics Tag

Once your Google Analytics tag is installed and working, you can optimize it to get more helpful information. Here’s how to make the most of your Google Analytics setup:

Customizing Tracking Settings

  • Set Up Goals: Goals help you track essential actions on your website, like completing a purchase or signing up for a newsletter. To set up a goal, go to the “Admin” section in Google Analytics, select “Goals,” and click “New Goal.” Choose a type (like destination or duration), and fill in the details to track the actions that matter most to your business.
  • Enable eCommerce Tracking: If you run an online store, enabling eCommerce tracking lets you see how much money you’re making and where your sales are coming from. In Google Analytics, go to “Admin,” select your property, click on “Ecommerce Settings,” and turn on the “Enable Ecommerce” option. Follow the instructions to add extra code to your site if needed.

Utilizing UTM Parameters

  • Create UTM Parameters: UTM parameters are tags you add to your URLs to track where your traffic is coming from. For example, add parameters to a link in an email to see how many people clicked through. Use Google’sGoogle’s Campaign URL Builder to create these tags. Enter your website URL, source (like email or social media), medium (like banner or post), and campaign name. This helps you see which marketing efforts are working best.
  • Analyze Campaign Data: Once you’ve added UTM parameters to your links, you can track them in Google Analytics under “Acquisition” and “Campaigns.” This lets you see how each campaign performs and helps you make better marketing decisions.

Integrating with Google Ads

  • Link Google Ads and Google Analytics: Connecting Google Ads with Google Analytics helps you see how your ads perform on your site. Go to Google Analytics, click “Admin,” then “Google Ads Linking,” and follow the steps to link your accounts. This allows you to view ad performance data directly in Google Analytics.
  • Analyze Ad Performance: After linking, you can see detailed reports about your ad campaigns under “Acquisition” and “Google Ads.” This helps you understand which ads bring the most visitors and which ones lead to conversions so that you can improve your ad strategy.

Common Issues and Troubleshooting

You might encounter some common issues even with a correctly set up Google Analytics tag. Here’s how to identify and fix them:

Tracking Code Not Found

  • Issue: The Google Analytics tag must sometimeneeds be added to your site correctly or is missing entirely.
  • Solution: Double-check that the tracking code is placed correctly in your website’swebsite’s HTML. It should be added just before the closing </head> tag. If you’re using a website builder, ensure you’ve pasted the code in the right spot, often under “Header” settings.

No Data in Reports

  • Issue: If you do not see any data in your Google Analytics reports, there might be a problem with the setup.
  • Solution: Ensure that the tracking code is correctly installed and there are no errors. Use tools like Google Tag Assistant to check if the code is firing correctly. Also, check your Google Analytics account settings to ensure you’re looking at the right property and view.

Data Discrepancies

  • Issue: Sometimes, the data in Google Analytics might not match what you see on your website or in other reports.
  • Solution: Look for familiar reasons, such as filters that might exclude some data or issues with setting goals. Ensure all your tracking settings are configured correctly and no unnecessary filters are applied.

Spam Traffic

  • Issue: Spam or bot traffic can inflate your website’s data, making it less accurate.
  • Solution: Use filters to exclude known spam traffic from your reports. In Google Analytics, go to “Admin,” select “Filters,” and add filters to exclude traffic from specific IP addresses or known spam sources.

Incorrect Goal Tracking

  • Issue: Goals need to be tracked correctly if they are set up with the wrong details or if there are issues with the goal setup.
  • Solution: Review the goal settings in Google Analytics to ensure they match the actions you want to track. Double-check the URLs or events that trigger the goals and ensure they are correctly implemented on your website.

Setting up and optimizing your Google Analytics tag is crucial for understanding how visitors interact with your website. By following the steps to install the tag, customize your settings, and verify the setup, you ensure that you’re collecting accurate data.

Troubleshooting common issues, such as missing data or incorrect tracking, helps maintain the quality of your insights. Regularly checking and optimizing your Google Analytics tag will help you make informed decisions to improve your website’s performance and achieve your business goals.

Migrating from Squarespace to WordPress

Deciding to move your website from one platform to another, like from Squarespace to WordPress, is a big step. This process, known as website migration, is important for several reasons. It can help you meet your growing needs by adding more complex features, improving your site’s search engine optimization (SEO), or reducing costs in the long run. In simple terms, migration can improve your website as your needs change. Let’s explore how making this switch might benefit you and how to do it smoothly.

The Benefits of Migrating from Squarespace to WordPress

Moving your website from Squarespace to WordPress can bring several advantages. Here’s what you can expect:

Enhanced Customization Options

WordPress lets you change almost every part of your website. WordPress gives you the tools to do it your way, whether you want to adjust the layout, add new features, or change how your site looks. This freedom means your website can grow and change as your needs do.

Greater Plugin Availability

Plugins are like apps for your website. WordPress offers thousands of plugins that you can add to your site. These plugins can do everything from adding photo galleries and submission forms to creating online stores.

SEO Advantages

Being found on Google is key to getting more visitors to your site. WordPress is well-known for being SEO-friendly. It makes it easier for search engines to understand your site, which can help you rank higher in search results. This means many people can find and visit your website.

Cost-Effectiveness and Scalability

WordPress can be a more budget-friendly option in the long run. It’s free to use, and you only pay for extra services like hosting and premium plugins. WordPress grows with you as your website or business grows, handling more visitors or content without needing a complete overhaul.

Switching to WordPress can be smart, especially if you’re looking for more control over your website and planning for future growth.

Pre-Migration Checklist

Before you start migrating from Squarespace to WordPress, it’s important to prepare. Here’s what to consider:

  1. Take Inventory of All Pages: List all the pages on your Squarespace site. This helps you ensure that everything is transferred and nothing is left behind.
  2. Backup Your Site: Save all your content, including text, images, and other files. Having a backup ensures you can restore anything if needed.
  3. Check for Custom Code Snippets: Save these snippets if you have added custom code to your Squarespace site. You will need them when you set up your WordPress site.
  4. Review Current SEO Settings: Note your SEO settings and keywords. This will help you maintain your search engine rankings when you switch to WordPress.
  5. Gather All Media Files: Download all images, videos, and other media from Squarespace. Later, upload them to WordPress.
  6. Evaluate Third-Party Integrations: List any third-party services or plugins you use with Squarespace. Find similar options for WordPress or plan to set them up again after migration.
  7. Plan Your New Site Structure: Decide how your WordPress site looks and works. Planning ahead makes the setup process smoother.

How to Move from Squarespace to WordPress

Moving your website from Squarespace to WordPress is a straightforward process if you follow these steps:

Choose a Host

First, you must pick a hosting provider for your new WordPress site. Hosting is where your website lives on the internet. Popular hosting providers include Bluehost, SiteGround, and WP Engine. Look for a host that offers good customer support and reliable performance. Many hosts offer one-click WordPress installation, which makes setting up your site easier.

Install WordPress

Once you have chosen a host, the next step is to install WordPress. Most hosting providers have a simple process for this. After logging into your hosting account, look for an option to install WordPress. Follow the on-screen instructions. This usually involves selecting your domain name and setting up an admin username and password.

Export Squarespace Content

Next, you need to export your content from Squarespace. Go to your Squarespace settings and find the option to export your content. Squarespace enables you to export your pages and blog posts as an XML file. Download this file to your computer. Note that some content, like product pages, may not be included in the export and might need to be moved manually.

Import Squarespace Content into WordPress

Now it’s time to bring your content into WordPress. Log in to your WordPress dashboard and go to ‘Tools’> ‘Import.’ Choose the option to import an XML file. Upload the file you exported from Squarespace. WordPress will then import your pages and posts. You may need to assign authors to the content during this process.

Import Your Squarespace Images into WordPress

Sometimes, images don’t transfer with the rest of your content. You will need to manually upload them to WordPress. Download your images from Squarespace and save them to your computer. Then, in your WordPress dashboard, go to ‘Media’> ‘Add New.’ Upload your images here. You can then add them back into your pages and posts where needed.

Customization Tips After Migration

After moving your site from Squarespace to WordPress, you’ll want to customize it to match or enhance your previous design. Here’s how you can do it:

  1. Choose a Similar Theme: Pick a WordPress theme that closely matches your old Squarespace design. There are many free and premium themes available. Look for one that offers the layout and style you like.
  2. Use Page Builders: Page builders like Elementor and Beaver Builder can easily help you create custom layouts. These tools let you drag and drop elements onto your pages, making it simple to recreate your Squarespace design or make improvements.
  3. Customize Your Theme: Most WordPress themes offer customization options. Go to the WordPress Customizer to change colors, fonts, and other style settings. This helps you tweak the theme to better match your brand.
  4. Add Custom CSS: If you have specific design needs that the theme and page builder can’t handle, you can add custom CSS. This allows you to fine-tune the aspect of your site. WordPress has a built-in CSS editor in the Customizer.
  5. Install Essential Plugins: Enhance your site’s functionality with plugins. For example, you can use a plugin for advanced galleries, contact forms, or social media integration. Choose plugins that help your site look and work the way you want.
  6. Optimize for Mobile: Make sure your site looks good on mobile devices. Many themes are responsive, but check your site on different devices to ensure a great user experience everywhere.
  7. Test Your Site: After customizing, test your site to ensure everything works well. Check all links, forms, and interactive elements to ensure they function properly.

Troubleshooting Common Issues

Migrating your website from Squarespace to WordPress can come with a few challenges. Here’s how to address some common issues:

Data Import Issues

Sometimes, not all your content will transfer smoothly. If you find some pages or posts missing, you might need to manually copy and paste the content into WordPress. Check the import settings to ensure all types of content are selected during the import process.

Broken Links

After migration, you might find some links broken. Use a plugin like Broken Link Checker to identify broken links on your site. Then, update these links manually to ensure all parts of your site are connected correctly.

SEO Rankings

Maintaining your SEO rankings is crucial during migration. Set up 301 redirects to point old Squarespace URLs to the new WordPress URLs. This helps search engines understand that your content has moved, preserving your rankings. Use an SEO plugin like Yoast SEO to optimize your content and meta tags in WordPress.

Missing Images

If images didn’t transfer during the migration, upload them manually to the WordPress media library. Then, update your posts and pages to include the correct images. This ensures your visual content is restored and displays correctly.

By addressing these common issues, you can ensure a smoother migration process and maintain the quality and performance of your website on WordPress.

Post-Migration Maintenance

Once you’ve migrated your site from Squarespace to WordPress, keeping it well-maintained is key. Here are some tips to help you:

  1. Regular Backups: Make sure to back up your site regularly. Use plugins like UpdraftPlus or BackupBuddy to schedule automatic backups. This way, you can restore your site if anything goes wrong.
  2. Keep WordPress Updated: Always update WordPress to the latest version. Updates often include crucial security fixes and new features. Also, update your themes and plugins regularly.
  3. Use Security Plugins: Protect your site from hackers with security plugins like Wordfence or Sucuri. These plugins help monitor your site for threats and provide tools to keep it secure.
  4. Monitor Performance: Use tools like Analytics and PageSpeed Insights to monitor your site’s performance. Ensure your site loads fast and runs smoothly for all users.
  5. Check for Broken Links: Frequently check your site for broken links. Plugins like Broken Link Checker can help find and fix these links, improving user experience and SEO.
  6. Optimize Your Database: Over time, your WordPress database can become cluttered. Use plugins like WP-Optimize to clean up your database, which can help your site run faster.
  7. Regular Content Updates: Keep your content fresh and suitable. Update your blog posts, pages, and other content regularly to keep your audience engaged and enhance your search engine rankings.
  8. Manage User Roles: If you have multiple users, manage their roles and permissions carefully. Only give access to those who need it to keep your site secure.

Why Choose Chetaru?

Migrating your website is a big step, but with Chetaru, you’re with a team of professionals. Our experience and expertise ensure that your migration is handled professionally, allowing you to enjoy the benefits of WordPress without the hassle. Let us help you take your website to the next level. Contact us today to get started!

Migrating from Squarespace to WordPress is essential for those looking to gain more control and flexibility over their website. The process opens up a world of enhanced customization options, greater plugin availability, improved SEO, and cost-effectiveness. These benefits are crucial as they allow your website to grow and adapt to changing needs, ensuring it remains competitive and effective. Maintaining your new WordPress site with regular updates, backups, and security measures ensures it continues to perform well. If you want to enhance your website’s capabilities and have more control over its design and functionality, switching to WordPress is a smart and strategic move.